
How to Draw a Tire: Step-by-Step Art Tutorial for Beginners
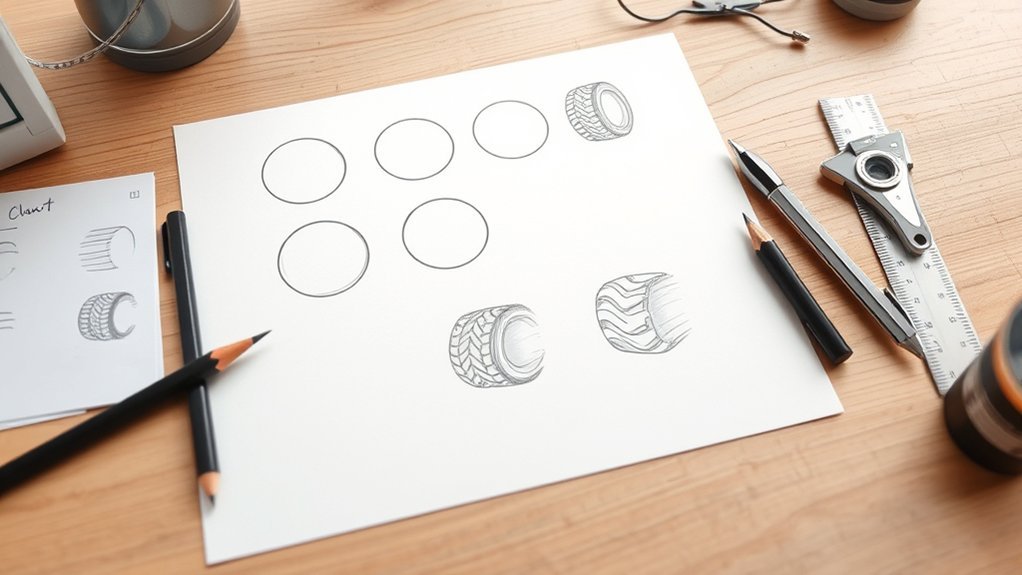
Start by sketching two proportionate ovals for the tire’s outer and inner edges, then connect them with smooth curves to form the sidewall. Draw a smaller circle inside for the rim and add a second line for depth. Mark evenly spaced curved tread lines around the surface, then add short zigzag grooves. Clean up the line art, shade the tire gray and black, and finish with highlights for realism. Keep going, and you’ll uncover even more helpful details.
Key Takeaways
- Sketch two concentric ovals to form the tire’s outer edge and inner rim.
- Connect the ovals with smooth side curves to create a balanced cylindrical shape.
- Add evenly spaced tread lines and zigzag grooves around the outer surface for texture.
- Refine the rim, tread, and sidewalls with clean, symmetrical line work and subtle shading.
- Finish with gray tones, highlights, and wear marks to make the tire look realistic.
Draw the Tire Sidewall
Start the sidewall by sketching two proportionate ovals for the tire’s outer and inner edges, keeping them smooth and symmetrical so the shape feels realistic. In this tire drawing, you’ll connect those curves with gentle, straightening lines to form a strong cylinder. Keep your hand light so you can adjust the shape until the tire sidewall looks balanced and free. Next, add a small curved line along the inner edge to define the sidewall’s depth and keep the form consistent. Then, mark evenly spaced curved lines around the outer surface for the tire tread, varying the arcs a little so the texture feels natural. If you want more grit, place short zigzag grooves along the edge. Each mark should support the shape, not trap it. You’re building a clean, liberated design by trusting simple structure, steady rhythm, and your own eye. Additionally, remember that tire tread design, such as asymmetric tread patterns, can enhance performance and traction in various conditions.
Add the Inner Rim
Draw a smaller circle inside the tire outline to create the inner rim, keeping it centered and even. Then add rim depth with a second line just inside the first, using a slightly darker pencil or marker to make it stand out. Finish by refining the rim’s shape so it stays smooth, symmetrical, and neatly aligned with the tire’s inner edge. This attention to detail can enhance the overall realism of your drawing, just as tire performance is crucial for ensuring a smooth ride.
Draw The Inner Circle
Next, add a smaller circle inside the outer tire shape to form the inner rim, keeping it centered so the tire looks balanced and realistic. In this drawing lesson, you’re shaping Car Tires with care, so use a compass or template if you want a clean, accurate line inside the tire. Match the circle’s size to the vehicle type you’re drawing, because different tires need different proportions. Keep your hand steady and trust the process. Then, lightly curve the inner edge so the rim begins to read as three-dimensional without overworking the line. If your chosen style calls for it, sketch simple bolt marks or design details. These touches help the wheel feel true, confident, and free.
Add Rim Depth
Add depth to the rim by drawing a second, smaller circle inside the tire, keeping it centered so the wheel stays balanced and accurate. This inner ring gives your cars tires a solid base and helps the wheel feel grounded. Then, trace a slight curve or lip along the edge to suggest the rim’s three-dimensional form. Choose a rim style that fits your vision, and sketch the first shapes of the spokes from the center outward. Keep each spoke evenly spaced so the design feels free and confident. Add simple grooves, bolts, or patterns to build realism without crowding the space. Make sure the rim and tire flow together with matching curvature and proportion, so the whole wheel looks strong and complete.
Refine The Rim Shape
Start by sketching a smaller circle inside the outer rim to define the inner rim, making sure it stays centered so the wheel looks balanced. Use light pencil strokes at first so you can shift the size or placement without fighting the page. Then connect the inner circle to the outer rim with a gentle curved line; this adds depth and makes the wheel feel solid and free. As you refine the shape, think about rim styles—simple, bold, or detailed—and weave in design patterns or spoke ideas if they fit your vision. Keep your lines clean, erase extra guidelines, and sharpen the edges. These depth techniques help you create a polished rim that feels confident, open, and fully your own.
Sketch Even Tire Treads
First, mark evenly spaced points around the tire so your tread pattern stays balanced and symmetrical. Then repeat curved tread lines along the contour, keeping each one consistent as you work around the shape. You can vary the line width a bit, but keep the overall pattern even so the tire looks realistic. Additionally, consider the tread design of all-terrain tires, as they often feature more aggressive patterns for improved grip.
Mark Even Tread Spacing
Lightly sketch horizontal guide lines around the tire to map out even tread spacing, keeping each mark balanced so the pattern feels consistent. Use a ruler or straight edge to place equal intervals around the circumference, and you’ll keep your tire tread design organized from the start. Think about tread pattern types and tire functionality considerations: off-road tires need deeper, bolder spacing, while performance tires usually call for shallower, cleaner marks. As you draw, vary tread widths a little so the surface looks real, not rigid. Step back often and check symmetry, because clear spacing gives your tire a strong, free, and functional look. These small decisions help you guide the pattern with confidence and create a design that feels intentional and precise.
Repeat Curved Tread Lines
With the spacing marked out, sketch curved tread lines that follow the tire’s circumference and keep them evenly placed all the way around. Use light pencil strokes so you can adjust each line before committing to darker marks. As you repeat the shapes, let your tread design feel free and natural, not rigid. Add slight curvature variation from line to line to mimic real rubber and keep the surface alive. Check tire symmetry often by comparing one side with the opposite side as you draw. Then layer in small grooves and subtle pattern breaks to give the treads more texture and depth. Keep each mark confident, and let the tire’s form lead you. This approach keeps your sketch balanced, clean, and ready for the next stage.
Balance Tread Pattern Shape
Sketch a series of evenly spaced curved lines around the tire to establish the tread pattern’s basic shape. Keep each segment equal in size so your design feels steady and free, not cramped or uneven. Follow the tire’s contour with every curve, because that natural flow strengthens tread pattern symmetry and gives the wheel a grounded look. Add slight changes in depth to introduce tread texture variation; this makes the surface feel realistic and highlights tread functionality importance. As you refine, step back often and check the whole pattern. Adjust any line that drifts or crowds its neighbors. When you balance shape, spacing, and curvature, you create a tire that looks confident, clean, and ready to roll.
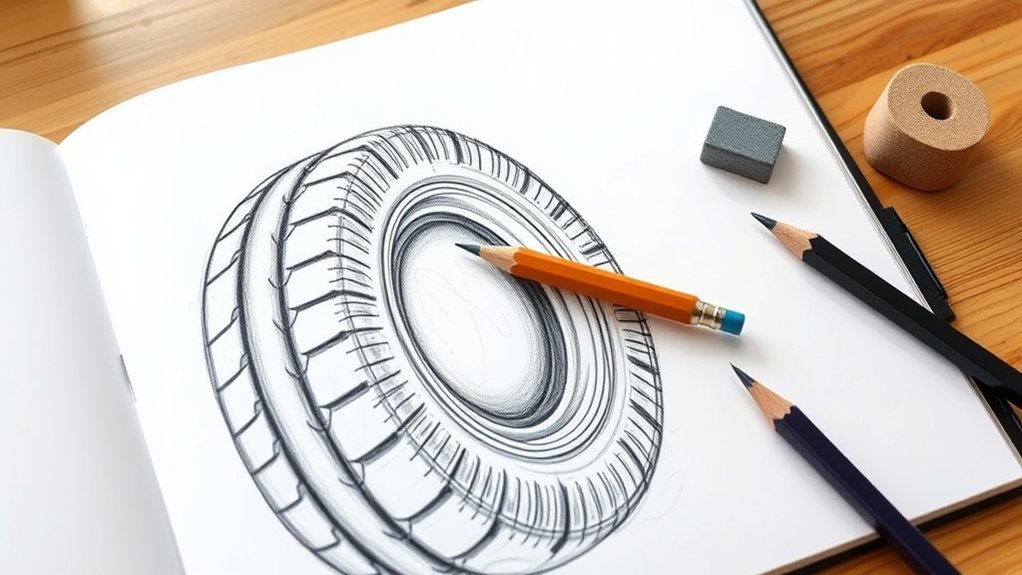
Add Grooves and Depth

Now add grooves by drawing evenly spaced zigzag lines along the outer side of the tire. Keep the spacing consistent so the tread feels real and balanced. As you work, vary the groove depth a little; this groove variation gives your tire dimension and makes it look ready for action. Use curved lines where the tread turns, because they follow the tire’s natural flow and keep the design smooth. Place each groove with care so the pattern supports the tire’s shape instead of crowding it. Then use shading techniques inside the deeper cuts to push those areas back and highlight the raised sections. This small contrast adds realism and strengthens the sense of tire functionality. If you want a bolder look, deepen a few grooves more than others, but stay subtle. Your goal is a solid, free-looking tire that feels grounded, practical, and alive on the page. Additionally, consider the tread design features to enhance the realism of your tire drawing.
Refine the Tire Line Art
Carefully refine the tire’s outline so the curves stay smooth and symmetrical, giving the whole shape a cleaner, more balanced look. You’ll strengthen your drawing by applying tire design principles: keep the sidewalls even, and make the tread patterns feel intentional and tidy. Use clean, consistent strokes so the form reads clearly and confidently.
- Trace the outer edge with steady pressure to unify the silhouette.
- Tighten the sidewalls and tread details with crisp, controlled marks.
- Shape the rim and spokes with defined edges, then suggest depth with shading methods.
- Use line weight techniques: thicken outer contours, and keep inner details lighter.
Step back often and compare both sides. If anything feels uneven, adjust it now. This careful refinement frees your drawing from guesswork and gives it a strong, polished finish. Additionally, consider how tire tread patterns contribute to performance characteristics like traction and handling.
Color the Tire Drawing
With the line art cleaned up, you can bring the tire to life with color. Use shades of gray on the outer surface to build rubbery depth, and fill the inner side with solid black for contrast. Apply shading techniques with gentle strokes or light smudging so the tones blend smoothly. These steps give you freedom to shape a tire that feels grounded and real. Adding elements of asymmetric tread patterns will enhance the overall realism of your drawing.
| Area | Color | Effect |
|---|---|---|
| Outer edge | Gray | Soft texture |
| Inner side | Black | Deep contrast |
| Top curve | Light gray | Bright reflection |
| Lower arc | Dark gray | Strong weight |
| Surface marks | Gray-black | Honest wear |
For extra texture enhancement, add a few highlights with white or pale gray where light would hit. Then finish with dirt flecks or tiny wear lines. These realism tips help your drawing look used, sturdy, and alive, not trapped in a flat outline.
Frequently Asked Questions
How to Draw Simple Step by Step for Beginners?
Start with simple shapes: you can sketch two matching ovals, then connect them to form a rounded tire. Use beginner techniques like light lines and slow strokes, and gather basic drawing materials such as paper and pencil. Add a smaller inner curve, then draw curved treads and zigzag grooves. These sketching tips help you build confidence, keep things free, and make your drawing look clean and balanced.
What Is the 4 8 8 Method of Drawing?
The 4 8 8 method of drawing is a simple roadmap: you start with 4 basic shapes, add 8 details, then finish with 8 refinement steps. With 80% of beginners feeling overwhelmed by complex subjects, this approach can free you up. You’ll build strong sketching techniques, keep tire proportions accurate, and use shading methods to add depth. Break it down, trust the process, and you’ll draw with more confidence and control.
How Do You Draw a Tyre?
You draw a tyre by sketching two slightly arched ovals, then connect them with smooth cylindrical lines. Add a small inner curve, then layer curved tire treads and tire textures around the surface. Vary each groove so it feels real. Finish with zigzag edges for depth, and shade it gray and black. You can shape it freely, and if you want realism, check tire pressure proportions as you refine the form.
What Is the 3% Rule for Tires?
The 3% rule means you replace your tires when tread depth drops to about 3% of its original depth, before grip fades and danger creeps in. You’ll want to check tread depth regularly, along with tire pressure and tire alignment, because worn tires can’t brake or corner well. Stay ahead of the slide, trust your gauge, and keep your ride safer, steadier, and ready for the road.
Conclusion
You’ve now built a solid tire drawing from the sidewall to the final color. Keep practicing, and you’ll notice your lines get cleaner and your treads more even each time. Did you know a typical car tire can have more than 30,000 tiny tread elements? That detail shows why simple shapes matter so much. Keep sketching, refining, and shading, and you’ll turn a basic outline into a realistic tire with confidence.
Related Articles
How Tall Is a 305 Tire? Exact Height, Width & Dimensions
Overall, a 305 tire’s height depends on more than width alone, and the exact dimensions can surprise you.
Read More
How Tall Is a 295 Tire? Exact Height, Width & Dimensions
Discover the exact height, width, and dimensions of a 295 tire, and see why the full size code could change everything.
Read More
How Tall Is a 275 70R18 Tire? Exact Height, Width & Dimensions
How tall is a 275 70R18 tire, and what do its exact dimensions mean for your vehicle?
Read More