
How to Reseat a Tire Bead Off-Road in an Emergency
A tire bead can lose its seal after a hard side hit, low-pressure off-road driving, debris between the rim and bead, or a tire that has been run too soft. This guide explains how to reseat a tubeless tire bead as safely as possible in the field, but only when the tire, rim, valve stem, and bead area are undamaged. Do not attempt this on multi-piece or split-rim wheels, a tire that was driven flat at speed, a torn bead, a cracked or bent rim, or any assembly you cannot positively identify.
Quick Answer
To reseat a tire bead, clean and inspect the rim and tire bead, lubricate the bead with approved tire lubricant or mild soap-water, use a high-volume air source with the valve core removed, and keep everyone out of the inflation trajectory. Never use starting fluid or fire to seat a bead.
Key Takeaways
- Cleanliness matters: dirt, mud, old sealant, corrosion, and bead damage can prevent an airtight seal.
- Use a compressor, CO2 tank, or bead-seating tank for airflow; do not use flammable products or ignition methods.
- Follow the tire or wheel manufacturer’s bead-seating pressure limit. If the limit is unknown, do not exceed 40 psi.
- After the bead seats, check for leaks with soapy water, set the tire to the correct cold pressure, and recheck it before driving at speed.
At a Glance
| Time Required | 10–30 minutes if the tire and rim are undamaged |
| Difficulty | Moderate; stop if the bead will not seat within the safe pressure limit |
| Tools Needed | Air compressor, CO2 tank, or bead-seating tank; tire pressure gauge; valve-core tool; approved tire lubricant or mild soap-water; clean rags; eye protection; gloves; optional ratchet strap |
| Cost | Usually $0–$30 if you already carry inflation tools; professional service costs more but is safer for damaged or stubborn assemblies |
Warning: Tire inflation can cause sudden bead movement, strap failure, or explosive tire/wheel separation. Wear eye protection, keep all bystanders out of the trajectory, use a clip-on chuck and gauge when available, and never stand, lean, or reach over the tire while adding air.
Know When Your Tire Needs Bead Reseating

Three signs usually point to a bead-seal problem: the tire will not hold pressure, you can see a gap between the tire bead and rim, or you hear air escaping around the rim instead of the valve stem. This often happens after driving at very low pressure, hitting a rock or curb, or packing mud and debris into the bead area.
Look closely before adding air. A reseat attempt is only reasonable if the bead is intact, the sidewall is not cut or bulging, the rim is not cracked or bent, and the tire and wheel are the correct matching size. If the tire was driven flat for any distance at road speed, internal damage may not be visible from the outside.
Note: A bead that repeatedly loses air is not “fixed” just because it reseats once. Repeated bead loss usually points to damage, wrong pressure, rim corrosion, bead contamination, or an incorrect tire/wheel match.
Safety Checks Before You Add Air
Before you try to reseat the bead, make these checks:
- Confirm the tire size matches the wheel size exactly. Do not force a mismatched tire and rim together.
- Inspect both bead areas for cuts, torn rubber, exposed cords, or old sealant buildup.
- Inspect the rim flange and bead seat for dents, cracks, corrosion, sharp edges, or heavy pitting.
- Check the valve stem for cracking, leaks, or a loose core.
- Move people away from the tire’s sidewall path and inflation trajectory.
- Use a restraining device, barrier, or tire cage whenever one is available.
- Use a pressure gauge or regulator so you know the pressure during seating.
Professional tire-servicing rules from OSHA’s rim-wheel standard require proper training, restraining equipment or barriers in covered servicing situations, and inflation equipment that lets the worker stand outside the trajectory. Even if you are doing a field repair, the same safety principles apply.
Pick Your Air Source: Compressor, CO2, or Bead-Seating Tank
The goal is not just pressure. You need enough air volume to push the bead outward faster than air leaks around the rim. Choose the safest air source you have:
| Air Source | Best Use | Safety Notes |
|---|---|---|
| High-volume compressor | Best all-around option for garage or trail support vehicles | Use a gauge, remove the valve core for faster flow, and stay out of the sidewall path. |
| CO2 tank | Fast field inflation when a compressor is too slow | Control the flow with a regulator and monitor pressure closely. |
| Bead-seating tank | Stubborn beads that need a short, high-volume air burst | Use according to the tool manufacturer’s instructions and keep clear of the trajectory. |
| Starting fluid, ether, gasoline, brake cleaner, or fire | Do not use | Flammable or volatile substances can cause tire/wheel separation, burns, hidden damage, or later failure. |
The U.S. Tire Manufacturers Association warns not to use flammable or volatile substances to aid bead seating and says to follow the tire manufacturer’s bead-seating pressure limit; otherwise, do not exceed 40 psi.
Clean the Rim and Tire Bead First
Scrape away mud, sand, stones, and old sealant before you attempt reseating. Dirt trapped between the bead and rim creates leak paths and can make you add more air than necessary.
Use a clean rag to wipe the bead and rim flange. Then run your fingers around the rim surface, feeling for dents, burrs, corrosion, or cracks. Damage here can stop the bead from sealing and can make the tire unsafe even if it briefly holds pressure.
| Cleaning Priority | Why It Matters | Consequence of Neglect |
|---|---|---|
| Remove all mud and debris | Allows direct bead-to-rim contact | Air leaks and failed reseating |
| Inspect the rim | Finds dents, cracks, corrosion, and sharp edges | Chronic leakage or unsafe tire service |
| Remove old bead residue | Old sealant and grit can block the seal | Poor sealing and repeated failure |
| Apply proper lubricant | Helps the bead slide evenly into place | Difficult mounting or bead damage |
| Final wipe-down | Confirms the surface is ready | Repeated attempts and wasted air |
Use approved tire mounting lubricant when you have it. In the field, a small amount of mild soap-water can help, but avoid petroleum products, silicone, antifreeze, concentrated chemicals, and anything flammable.
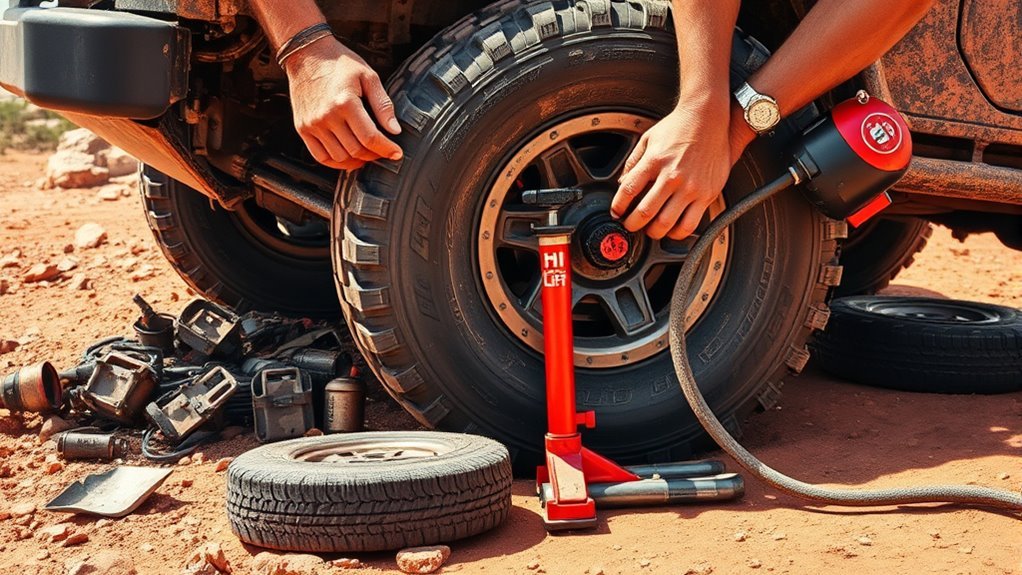
Secure the Tire With a Ratchet Strap
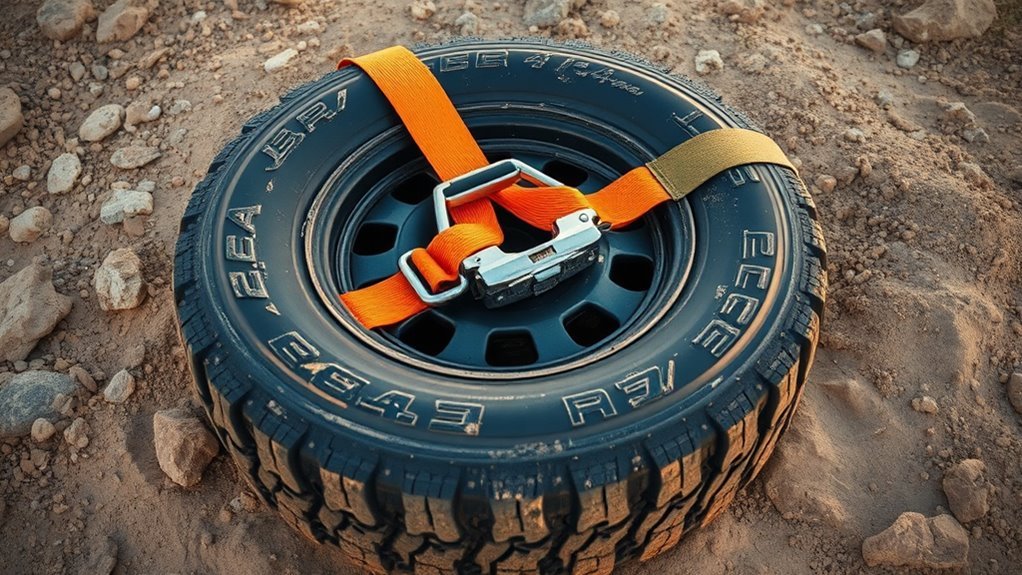
A ratchet strap can help push the sidewalls outward so the bead starts closer to the rim flange. Wrap the strap around the tire’s tread circumference, not through the wheel. Tighten it only enough to slightly change the tire shape and bring the beads closer to the rim.
Warning: A ratchet strap is not a tire cage, restraining device, or substitute for safe inflation equipment. Do not put your face, hands, arms, or body over the sidewall while air is being added. Stop if the strap slips, frays, twists, or loads unevenly.
Why Ratchet Straps Help
When the bead is far from the rim, air escapes as quickly as you add it. A strap compresses the tire’s center, which can push the sidewalls outward and reduce the gap. This gives your air source a better chance to build the first few pounds of pressure needed to start sealing.
Use gradual tension. Over-tightening can distort the tire, make the bead sit unevenly, or create a hazard if the strap releases suddenly.
Step-by-Step Strap Method
- Lay the tire and wheel flat on stable ground with the valve stem accessible.
- Clean the rim and bead, then apply a thin film of approved tire lubricant or mild soap-water around the bead area.
- Wrap the ratchet strap around the tread circumference and tighten it until the sidewalls move outward slightly.
- Remove the valve core to increase airflow.
- Connect your air source with a gauge or regulator and add air in short, controlled bursts while staying out of the sidewall path.
- Listen for the bead to pop into place, then stop adding air and check that both beads are evenly seated.
- Release the strap slowly before final inflation. Reinstall the valve core and set the tire to the correct pressure.
Pro Tip: If the tire has been stored flattened or pinched, set it in the sun or gently work the sidewalls by hand before inflation. A tire that has regained its normal shape is much easier to seat safely.
Pop the Bead Into Place With a Controlled Blast of Air

Once the tire is centered on the rim and the bead area is lubricated, use a high-volume air source to push both beads outward. Remove the valve core so air can flow faster, then connect your compressor, CO2 tank, or bead-seating tank.
Add air in controlled bursts and watch both sides of the tire. The bead should move evenly toward the rim seat. You may hear one or two sharp pops as the beads seat. Stop immediately if the bead looks uneven, the tire bulges, the rim moves, the strap shifts, or the pressure approaches the manufacturer’s bead-seating limit without the bead seating.
When the bead seats, stop the air flow, reinstall the valve core, and inflate to the correct pressure. For normal road use, follow the vehicle manufacturer’s recommended cold tire pressure listed on the driver’s door placard or in the owner’s manual, not the maximum pressure molded into the tire sidewall. See NHTSA tire-pressure guidance for why cold pressure matters.
Lubricate the Bead for a Tighter Seal
Lubrication reduces friction so the bead can slide into the correct seat instead of hanging up on the rim. It also helps you avoid using excessive pressure to force a dry bead into place.
Proper Tire Lube or Soap-Water Application
Use approved tire mounting lubricant when available. Apply a thin, even film around both tire beads and the rim bead seat. If you are doing a trail repair and do not have tire lube, mild soap-water is a reasonable field fallback. Do not use petroleum-based products, silicone, antifreeze, concentrated cleaners, or flammable sprays.
Too much lubricant can make a mess and may hide leaks during your first inspection. You want a light coating, not pooled liquid.
Wet Rag Technique
A clean wet rag helps remove dust and light debris before lubrication. Wipe the entire circumference of the bead and rim, then inspect the rag. If it comes away dirty, keep cleaning until the sealing surfaces are clear.
Use clean water only for this wipe-down step. After the surface is clean, apply tire lubricant or mild soap-water as needed for seating.
Bead Cleaning Methods
Contamination is the enemy of a reliable bead seal. Work methodically:
- Strip the debris: Remove mud, sand, stones, dried sealant, and grit from the bead and rim.
- Inspect the surfaces: Feel for dents, corrosion, burrs, and cracks that could prevent sealing.
- Lubricate lightly: Use approved tire lubricant or mild soap-water on the bead and rim seat.
- Check the full circumference: Look at both sides of the tire before adding air.
Check for Leaks and Confirm the Seal
Do not assume the job is finished just because the bead popped into place. First, inspect both sides of the tire and confirm the bead line is even all the way around the rim.
Next, spray soapy water around the bead area, valve stem, and valve core. Bubbles mean air is escaping. If bubbles appear, deflate the tire completely, clean the area again, relubricate, and repeat the seating process. Do not keep adding pressure to “push through” a leak.
After the first leak check passes, let the tire sit for several minutes and recheck the pressure. If the gauge drops, you still have a leak. After driving a short distance, stop again and check the pressure before returning to highway speed or difficult terrain.
A tire bead is not safely reseated until the bead line is even, the tire holds pressure, and a soap-water check shows no bubbles around the rim or valve.
When the Tire Bead Won’t Seat: Quick Fixes
If the bead refuses to cooperate, do not reach for starting fluid or fire. Use safer troubleshooting steps:
- Deflate and reset: Let all air out, recenter the tire, and start again.
- Clean deeper: Remove old sealant, grit, rust flakes, and debris from the rim and bead.
- Relubricate: Apply a thin, even film of tire lubricant or mild soap-water.
- Increase air volume, not unsafe pressure: Remove the valve core and use a higher-volume compressor, CO2 tank, or bead-seating tank.
- Use the strap carefully: Tighten a ratchet strap only enough to help shape the tire, then release it before final inflation.
- Check size and damage again: A wrong-size tire, bent rim, torn bead, or cracked sidewall will not become safe with more pressure.
- Stop at the pressure limit: If the bead does not seat by the tire or wheel manufacturer’s bead-seating limit, stop, deflate, and get professional help. If the limit is unknown, do not exceed 40 psi.
When to Stop and Call a Tire Professional
Stop the repair and use a professional tire service if you find any of these problems:
- The tire bead is torn, kinked, or exposing cords.
- The sidewall has a cut, bulge, puncture, or heat-damage marks.
- The rim is cracked, bent, heavily corroded, welded, or repaired.
- The tire and wheel sizes do not match exactly.
- The assembly is a multi-piece, split-rim, heavy truck, agricultural, industrial, or unknown rim type.
- The tire was driven flat long enough to damage the inside casing.
- The bead will not seat within the safe bead-seating pressure limit.
Michelin’s tire safety guidance notes that tires should be mounted and demounted by trained professionals and that the tire and wheel diameters must be correctly matched before installation.
Frequently Asked Questions
Can I use starting fluid on aluminum rims safely?
No. Do not use starting fluid, ether, gasoline, brake cleaner, or any flammable spray to seat a tire bead on aluminum or steel rims. The blast can damage the tire, injure people nearby, or create a hidden failure risk. Use high-volume air, a bead-seating tank, proper lubricant, or professional service instead.
What tire pressure is too dangerous for reseating?
Follow the tire or wheel manufacturer’s bead-seating pressure limit. If you do not know that limit, do not exceed 40 psi while trying to seat the bead. Stop sooner if the tire distorts, the bead sits unevenly, the rim is damaged, or the bead still has not seated.
Should I remove the valve core before blasting air?
Yes, removing the valve core increases airflow and often helps the bead seat faster. Use a gauge or regulator, stay out of the tire’s trajectory, and reinstall the valve core as soon as the beads are seated. Then set the tire to the correct operating pressure.
How long should the ratchet strap stay on?
Keep the strap on only during the first part of inflation, while it helps the sidewalls move outward. Once the bead begins sealing and pressure starts to build, stop adding air and release the strap slowly before final inflation. Never leave a tight strap on while inflating to operating pressure.
Is it safe to reseat a tire with passengers nearby?
No. Keep passengers and bystanders away from the tire and out of the sidewall trajectory before adding air. Only the person controlling the air source should be near the tire, and that person should stay clear of the blast path.
Can I drive right after reseating the bead?
Only after the bead line is even, the tire passes a soap-water leak check, and the pressure holds for several minutes. Drive slowly at first, then stop and recheck pressure. For road use, set the tire to the vehicle manufacturer’s recommended cold pressure as soon as you can get a cold reading.
Why does my bead keep leaking after reseating?
Common causes include dirt under the bead, old sealant, rim corrosion, a bent rim flange, a damaged bead, a leaking valve stem, or pressure that is too low for the load and terrain. If cleaning and reseating do not solve the leak, have the tire removed and inspected.
Conclusion
Reseating a tire bead is a practical skill, but it is also a high-risk inflation job. The safe sequence is simple: inspect first, clean thoroughly, lubricate lightly, use high-volume air without exceeding the bead-seating limit, keep people out of the trajectory, and confirm the seal before driving. If the tire or rim is damaged, the bead will not seat, or you are unsure what type of wheel you are working on, stop and call a tire professional.
Sources
- OSHA 29 CFR 1910.177, Servicing multi-piece and single-piece rim wheels — training, restraining devices, inflation equipment, and trajectory safety.
- NHTSA TireWise tire safety guidance — recommended cold inflation pressure and vehicle placard guidance.
- Michelin Essential Tire Safety Tips — professional mounting, tire/wheel matching, lubrication, restraining equipment, and bead-seating pressure guidance.
- U.S. Tire Manufacturers Association Tire Information Service Bulletin — bead-seating pressure limits and warnings against flammable or volatile bead-seating aids.
- Titan International Important Safety Information — PPE, lubricant, trajectory, flammable-product, and bead-seating pressure warnings.
Related Articles
How to Register TPMS After Rotating Your 4Runner Tires
Step-by-step guidance on registering your TPMS after tire rotation in your 4Runner—discover the essential tips to ensure proper calibration.
Read More
Tire Plug vs Tire Patch: Which Is Safer for Your 4Runner
A tire patch outlasts plugs for your 4Runner, but one factor could change everything.
Read More
How to Install TPMS Sensors on a Toyota 4Runner
Step-by-step guide to installing TPMS sensors on your Toyota 4Runner—discover essential tips to ensure optimal performance and avoid common pitfalls.
Read More