
How to Fix a Tubeless Tire: Puncture Repair Without Removing It
You can fix most tubeless tire punctures without removing the tire. First, clean the hole and remove any debris. Then load a tubeless plug into the insertion tool, push it firmly into the puncture, and trim the excess cord. Add sealant if needed, inflate the tire to the recommended pressure, and check for bubbles or hissing with soapy water. If the leak persists, use a second plug or patch, and there’s more to know below.
Key Takeaways
- Clean the puncture area, remove debris, and wipe away sealant so the repair tool can bond properly.
- Use a tubeless plug kit to insert a rubberized cord firmly into the hole, leaving equal material on both sides.
- Add sealant around the puncture and inflate the tire with a pump or CO2 inflator to the recommended pressure.
- Check for leaks with soapy water, hissing, or pressure loss, and add a second plug if the first repair fails.
- Maintain tire sealant and inspect tire pressure regularly to prevent future flats and improve tubeless reliability.
What You Need for a Tubeless Plug Repair?
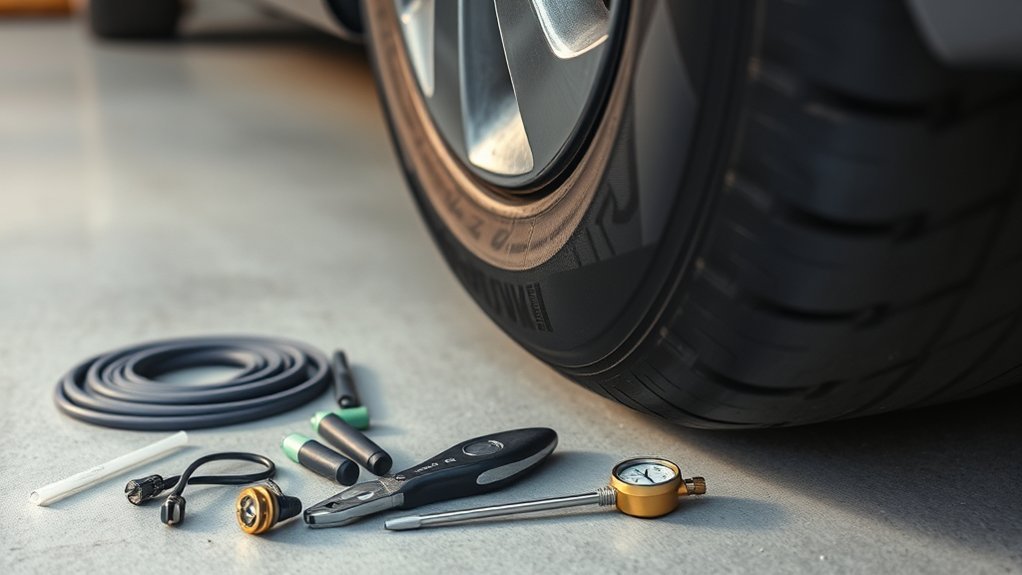
For a tubeless plug repair, you’ll need a tubeless plug kit with rubberized cords and an insertion tool to seal the puncture, plus a quality sealant like Stan’s or Orange Seal to help maintain an airtight finish. Keep your tubeless plug kit within reach so you can act fast and reclaim control when a sharp object compromises the tire. You’ll also want sealant ready, because it fills microleaks and supports the plug after installation. Carry a portable air pump or CO2 inflator to restore pressure immediately after plugging; without it, the repair can’t hold its shape. Tire levers help if you must lift the bead for inspection or access. Gloves are smart, too: they protect your hands from sealant and hidden debris while keeping the process clean. With these tools prepared, you can repair the puncture efficiently, preserve mobility, and stay self-reliant on the trail or road. Additionally, having a large supply of plugs ensures that you can handle multiple repairs as needed.
Clean the Tubeless Tire Puncture
Start by clearing any sealant residue from the puncture area so the repair can bond properly. Use a clean cloth or brush to remove embedded debris, dirt, and contaminants from the hole and surrounding surface. Make sure the area’s dry and clean before you apply sealant, a plug, or a patch. This preparation is crucial for achieving effective temporary seals that prevent air loss during your repair.
Clear Sealant Residue
Wipe away any visible sealant residue from the puncture area with a clean, dry cloth before you install a patch or plug. To clear sealant residue, work from the center outward and keep the surface free of moisture. If residue clings, dampen the cloth with a small amount of isopropyl alcohol and gently scrub the spot until it lifts. Don’t overwork the rubber; excessive abrasion can weaken the tire or disrupt its sealing layer. After you’ve cleaned the area, inspect it for a dry, residue-free finish so your patch kit can bond properly. Let the puncture site air-dry completely before you proceed. Clean prep gives you a stronger repair and keeps you in control of the fix, without removing the tire.
Remove Embedded Debris
Once the puncture site is clean and dry, inspect it closely for any embedded glass, nails, thorns, or other debris that could block a proper repair. Wear gloves, then use needle-nose pliers or tweezers to remove embedded debris from the punctured tubeless tire without widening the hole. Work slowly and pull straight out to avoid tearing the casing. Wipe the area with a clean cloth so dirt and sealant residue don’t compromise adhesion. If you find a tiny puncture, a light film of sealant can help stabilize it before patching. Keep the surface controlled and dry, because precision gives you the freedom to restore the tire cleanly and confidently.
- Inspect closely
- Grip debris gently
- Clean residue away
- Prep for patch
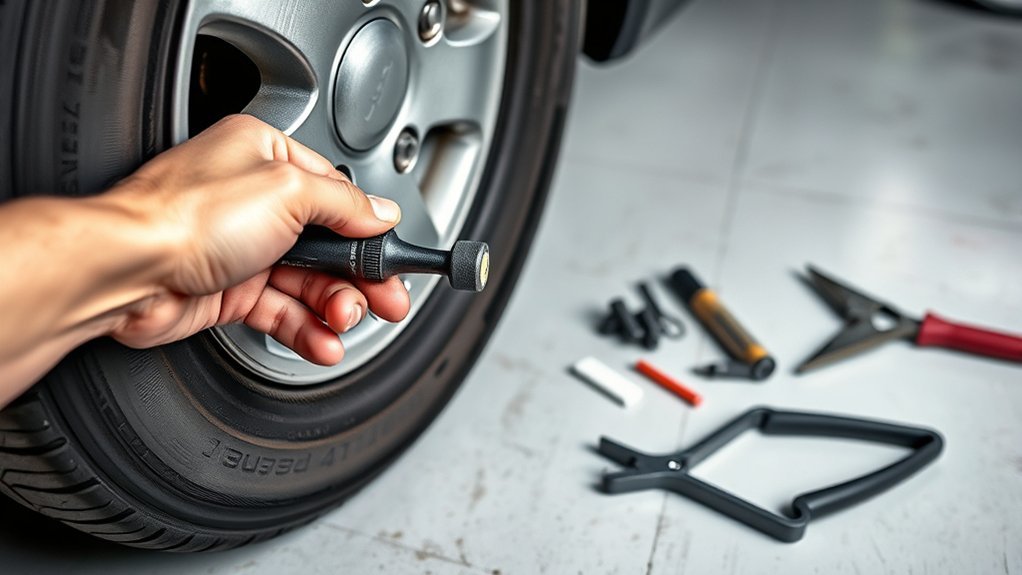
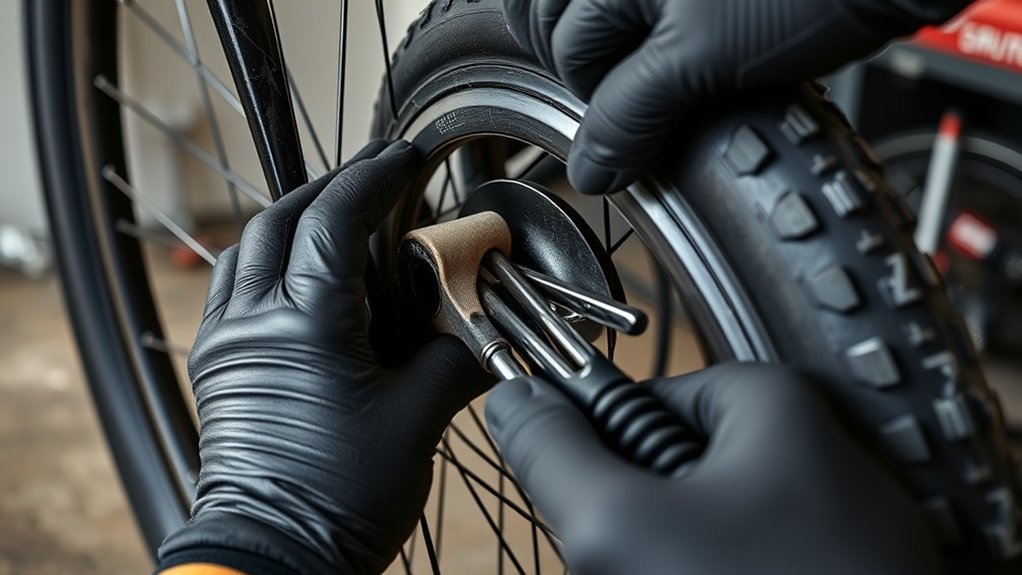
Choose the Right Tubeless Plug Kit
A good tubeless plug kit gives you the tools to seal a puncture quickly without removing the tire. When you choose tubeless plug kits, inspect the rubberized cords first; they’re the part that fills the hole and restores puncture resistance. Select a kit with multiple plug sizes so you can match narrow cuts and openings over 2 mm without forcing an undersized plug. Make sure the kit includes a solid insertion tool, because clean loading and placement make the repair faster and more controlled. You should also favor durable, weather-resistant materials, since roadside repairs expose your gear to heat, rain, dust, and vibration. Before you need it, read the instructions and understand the insertion sequence. Correct technique matters: it helps the plug seat tightly, hold air, and keep you moving with confidence. The right kit gives you freedom from unnecessary shop delays and lets you handle the repair yourself. Additionally, consider a kit like the HORHIZA 100 PCS Tire Repair Kit for quick emergency fixes that provide peace of mind during unexpected punctures.
Plug the Hole Without Removing the Tire
Insert the rubberized cord from your tubeless plug kit directly into the puncture to seal holes up to about 2 mm wide without removing the tire. First, clean the tubeless puncture so sealant residue won’t block the plug. Then use Plug kits to drive the cord in firmly and leave equal material on both sides. Add a small bead of sealant around the entry point to reinforce the repair and improve air retention. Let the plug cure for a few minutes before you inflate to the recommended pressure. This method is particularly effective for routine maintenance and keeps you moving with minimal delay while restoring control without surrendering your ride to a shop. Afterward, monitor tire pressure regularly; dried-up sealant or a weak fit can cause slow leaks that need quick attention.
- Clear debris.
- Insert the cord.
- Seal the edges.
- Wait, then inflate.
Check Whether the Plug Sealed Properly
With the plug in place, inspect the repair for bubbles around the puncture and inflate the tire to the recommended pressure. Watch the plug area closely; any foaming means air’s escaping and the seal isn’t holding. Listen for a hiss while the tire is pressurized, because that sound points to a leak. Mix water with a little soap and brush it over the repair; if bubbles appear, the plug hasn’t sealed correctly. After that, ride or park the tire and check pressure again over the next few hours. A noticeable drop shows the repair’s failing. You don’t need to accept a weak fix when a better one is within reach. If the plug won’t hold, install a second plug or switch to a vulcanizing patch for a tighter, more dependable seal. Keep the repair clean, dry, and monitored so your wheel stays ready for the road or trail. Thick rubber patches provide additional support in case of a more significant repair need.
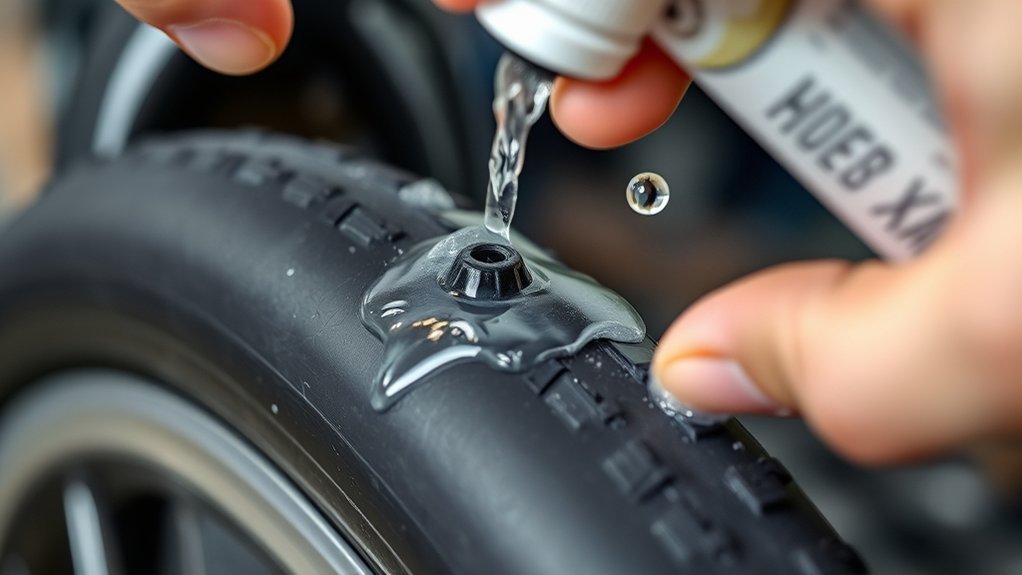
Add Sealant for Extra Leak Protection
Add fresh sealant to boost leak protection and help the tire self-seal small punctures up to about 2 mm. You should rotate the tire after adding sealant so it coats the puncture area evenly. Check the sealant level regularly and top it off when it’s dried out or after heavy use. Regular maintenance can enhance the performance of your tires, especially those with 6-ply tubeless construction.
Fresh Sealant Boost
If your tubeless tire is still leaking, a fresh sealant boost can restore its ability to close small punctures and porosity leaks. Remove the valve core, inject fresh sealant, and reseat the core tightly.
- Use a sealant injector to add the correct volume fast.
- Choose fresh sealant such as Stan’s or Orange Seal for reliable void filling.
- Spin and shake the wheel so the puncture that sealant reaches the sidewalls.
- Recheck pressure; dried sealant often causes losses, so top up regularly.
Maintain the proper sealant level to keep your system free and efficient. If you ride often, carry an injector for on-the-go renewal. Fresh sealant won’t fix major damage, but it can improve leak protection and keep you moving.
Seal Small Punctures
Small punctures up to about 2 mm wide can often be sealed by adding fresh tubeless sealant, giving you immediate leak protection from thorns, glass, or small stones. To restore that self-sealing barrier, inject the sealant through the valve or open the tire bead, then rotate and ride the wheel so the liquid spreads evenly and reaches the puncture. If the hole is small, the sealant should coagulate at the leak path and stop air loss without dismounting the tire. Use a quality formula such as Stan’s or Orange Seal for stronger sealing across pressure changes. Keep an eye on persistent leaks; dried latex won’t protect you, and neglected sealant can leave you stranded. With the right sealant, you keep control and roll free.
Top Off Regularly
Even after you seal a puncture, keep the tire’s protection working by topping off the sealant regularly. You should top off regularly to preserve an airtight barrier and keep latex sealant ready to close holes up to about 2 mm. Check levels every few months; dried sealant reduces pressure retention and weakens puncture defense. Add fresh sealant through the valve, then rotate the wheel to distribute it evenly.
- Inspect for low fluid.
- Refill with compatible sealant.
- Spin and shake the wheel.
- Test for leaks and ride.
This maintenance lets you ride lower pressures with better traction and comfort, while reducing the risk of larger repairs or tire replacement.
Pump the Tire Back Up
Once the puncture is sealed, rotate the tire so the sealant reaches the leak, then use a portable air pump or CO2 canister to bring it back up to the recommended pressure, typically 30–60 psi for most bike tires. As you pump, watch the gauge and keep the sealant moving so it can finish closing the puncture. If the tire dropped low enough to unseat the bead, give it a quick burst of air to lock it back onto the rim and restore an airtight seal. Inflate in short checks, not blindly, and stop before you exceed the sidewall maximum. For a rider reclaiming mobility, precision matters: too little pressure saps speed, too much risks failure. After inflation, spin the wheel and listen for hissing. If you still hear air escaping, the seal may need more sealant or another round of pumping. Keep monitoring pressure until it stays steady and the tire feels firm, balanced, and ready to roll. Additionally, ensuring proper tire pressure ratings is crucial for optimal performance and safety.
Repair Sidewall Cuts With a Patch or Boot
Sidewall cuts need a larger-than-the-damage tire boot or patch to restore a reliable seal, so clean the area thoroughly first and apply a strong adhesive around the edges before pressing the repair into place. On your tubeless tyre, choose a boot or vulcanizing patch that extends past every damaged edge; that extra coverage helps you keep rolling with confidence, not compromise.
Choose a patch that extends beyond every cut, and clean the area thoroughly before sealing it firmly.
- Wipe away dirt, sealant, and moisture.
- Spread adhesive evenly around the cut.
- Press the patch firmly for at least 30 seconds.
- Let it cure for one hour before reinflating.
If you’re fixing a tubeless setup, don’t rush the bond. A vulcanizing patch gives you a tougher, longer-lasting repair than glueless options, and it’s worth the wait. After curing, inspect the seal carefully and inflate to operating pressure. You’re rebuilding function with precision, not gambling on a weak seal.
Use a Tube When the Damage Is Too Big
If the damage is too large for sealant or a plug, fit a spare tube so you can keep riding safely. First, remove the tubeless valve, then inspect the casing and remove any glass, wire, or thorns that could cut the tube again. Check the rim depth before you install the tube; deep-section rims often need a long valve stem. Insert the tube carefully, seat the tire beads, and make sure the tube isn’t twisted or pinched. Inflate it to the pressure that matches your tire and rim setup, not the pressure you used when it was tubeless. This method won’t fully fix a tubeless system, but it restores mobility when damage is beyond sealant’s reach. Carrying a spare tube is essential for quick roadside fixes, so you can respond quickly, keep your momentum, and stay in control when the road tests your freedom.
Prevent Future Tubeless Flats
To reduce future tubeless flats, keep the system sealed, protected, and within its intended pressure range. You can preserve freedom on the road by maintaining every part of the tubeless setup with discipline.
- Check sealant regularly and top it off before it dries. Fresh sealant closes micro-punctures fast.
- Inspect rim tape for cuts, wrinkles, or gaps. A compromised tape bed invites slow leaks.
- Set tire pressure to the manufacturer’s range and verify it before every ride. Correct pressure prevents pinch flats and supports casing integrity.
- Remove embedded debris as soon as you spot it, and consider puncture-resistant tires or liners when you ride sharp terrain.
Use a pressure gauge, not guesswork. Spin the wheel after sealing to distribute sealant evenly, and recheck after a few hours. With consistent care, your tubeless setup stays responsive, resilient, and ready for demanding miles, especially when considering tire durability for long-term performance.
Frequently Asked Questions
How to Fix Tubeless Tyre Puncture at Home?
You fix a tubeless tyre puncture at home by locating the leak, cleaning the area, and inserting a plug from a tubeless kit. Use tire sealant options to boost sealing, then inflate and check for leaks. If the hole’s larger than 2 mm or on the sidewall, stop and use a patch or boot. Keep sealant fresh. This emergency repair lets you stay mobile without surrendering control.
Can You Repair a Puncture Without Taking the Wheel Off?
Yes, you can repair a puncture without taking the wheel off. You’ll use a tubeless plug kit to clean the hole, insert a rubberized plug, and let sealant finish the seal. This works for small punctures, usually up to 2 mm. Keep riding gently to distribute sealant. For resilient tire maintenance and puncture prevention, carry a spare tube and inspect the tread regularly.
How Can You Repair a Hole in a Tire Without Dismounting the Tire?
You patch the wound like a rebel mending a breached gate: clean the hole, then use a puncture kit to drive a rubber plug into the puncture without dismounting the tire. If the opening exceeds 2 mm, add tire sealant to reinforce the seal. Let it set for a few minutes, check pressure, and inspect the repair after riding to verify it stays airtight and ready.
How to Permanently Repair a Tubeless Tire?
You permanently repair a tubeless tire by cleaning the puncture thoroughly, then applying patch kits with a vulcanizing patch for a chemical bond. For holes over 2 mm, you’ll use a plug plus tire sealants to stop air loss. Press the repair firmly, then let the adhesive cure at least one hour before riding. Inspect the tire regularly, and keep sealant levels correct to prevent future punctures and preserve your independence.
Conclusion
With the right plug kit and a steady hand, you can fix a tubeless tire without breaking the bead or removing the wheel. Clean the puncture, insert the plug, and verify the seal before reinflating. If the damage is too large, switch to a patch, boot, or tube. Think of tire repair as sealing a leak in a dam: one small breach can flood the whole system. Keep your tires inspected and ready.
Related Articles
How Tall Is a 315 70R17 Tire? Exact Height, Width & Dimensions
What makes a 315 70R17 tire taller than expected? Discover its exact height, width, and dimensions before you choose.
Read More
How Tall Is a 315 70 R17 Tire? Exact Height, Width & Dimensions
Beneath the specs of a 315/70R17 tire lies its exact height, width, and fitment details—see what really makes it stand out.
Read More
How Tall Is a 315 70 17 Tire? Exact Height, Width & Dimensions
A 315/70R17 tire is taller and wider than you might expect—find its exact dimensions and what could affect fitment.
Read More