
How to Change a Lawn Mower Tire: Step-by-Step Simple Guide
To change a lawn mower tire, park on level ground, set the brake, disconnect the spark plug wire, and lift the mower securely with a jack or blocks. Deflate the tire, remove the wheel hardware, and pry the old tire off the rim. Match the replacement size and hub fit, then seat the new bead with soapy water. Reinstall, tighten to spec, inflate to the listed PSI, and check for wobble. More tips help prevent repeat issues.
Key Takeaways
- Park the mower on a flat surface, engage the brake, and disconnect the spark plug wire for safety.
- Deflate the tire, remove the wheel hardware, and pull the old tire off the rim with tire levers.
- Check the tire sidewall for the correct size, load rating, and hub fit before buying a replacement.
- Lubricate the tire beads with soapy water, mount the new tire, and seat both beads evenly.
- Reinstall the wheel, tighten the hardware to spec, inflate to the recommended PSI, and test for smooth rotation.
Tools You Need Before Starting
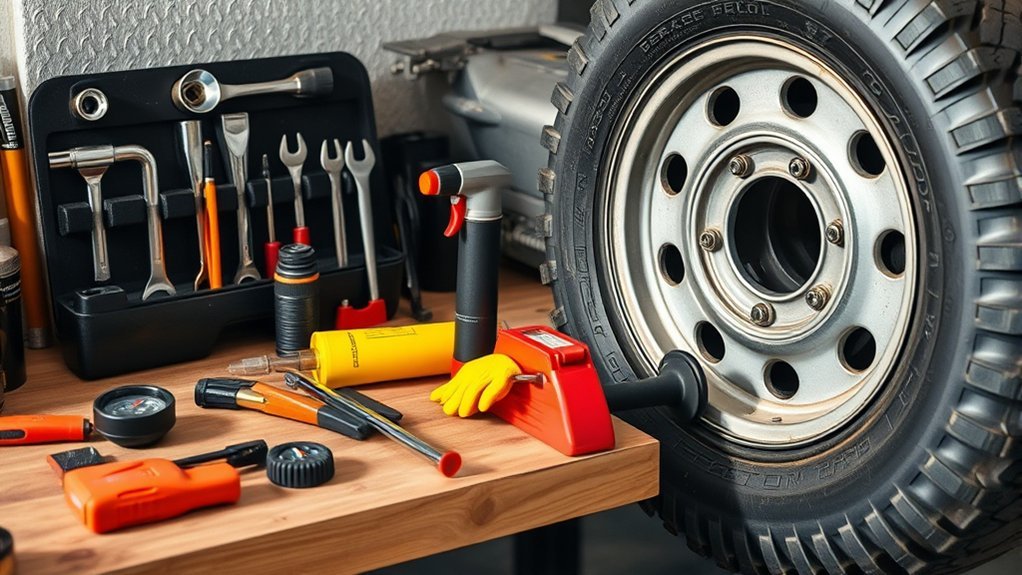
Before you start changing a lawn mower tire, gather the right tools: a jack or blocks to lift the mower, a socket wrench to loosen bolts, and a pry bar to remove the hubcap. Add pliers for any retaining clips, and keep a valve stem tool nearby if you need to pull or replace the stem. Have lubricant, like soapy water, ready to help the new tire slide onto the rim. Wear safety gloves to protect your hands from sharp edges and stubborn hardware.
Additionally, consider having an electric car jack handy for efficient lifting, especially if your mower is heavier than expected.
Lay out all tools before you begin so you don’t waste time hunting for gear. Check that your socket wrench fits the wheel bolts, and confirm your pry bar can reach under the hubcap cleanly. If the tire uses clips, pliers give you precise control. These simple tools help you work efficiently and keep control of the repair, so you can replace the tire without relying on a shop.
How to Secure the Mower Safely
Park the mower on a flat, level surface so it can’t roll while you work. Engage the parking brake, then block the wheels securely if you need extra stability or clearance. Disconnect the spark plug wire before you start to prevent any accidental engine start. This ensures that the mower remains stable while you change the tire, similar to the smooth-rolling profile of RONPOW tires that enhances control during operation.
Park On Level Ground
Set the mower on a flat, even surface so it cannot roll or tip while you change the tire. A level area gives you control and keeps the machine stable without extra strain. Shut the mower off, pull the ignition key, and engage the parking brake before you touch the wheel. This simple routine protects your hands and keeps the job disciplined.
- Confirm the flat surface is firm and dry.
- Lock the parking brake to stop movement.
- Place wheel blocks at the rear tires for added stability.
If you need to raise the front, use a jack under a sturdy frame point only. Working from a secure setup lets you act with precision and freedom, without fighting the machine or risking unnecessary injury.
Block Wheels Securely
Secure the mower by placing heavy-duty wheel chocks or blocks snugly against the rear tires, especially when you’re working on the front tires. Park on a flat, stable surface, then engage the parking brake to help secure the machine. Use automotive-grade wheel blocks that fit tightly and won’t slip.
| Checkpoint | Action |
|---|---|
| Surface | Park on level ground |
| Brake | Engage parking brake |
| Blocks | Place behind rear tires |
| Fit | Use heavy-duty chocks |
| Final check | Verify before jacking |
After you block each wheel, push the mower lightly to confirm it won’t roll. If it shifts, reset the blocks and brake. This simple control keeps you free to work safely and prevents accidents while you lift the mower with a jack.
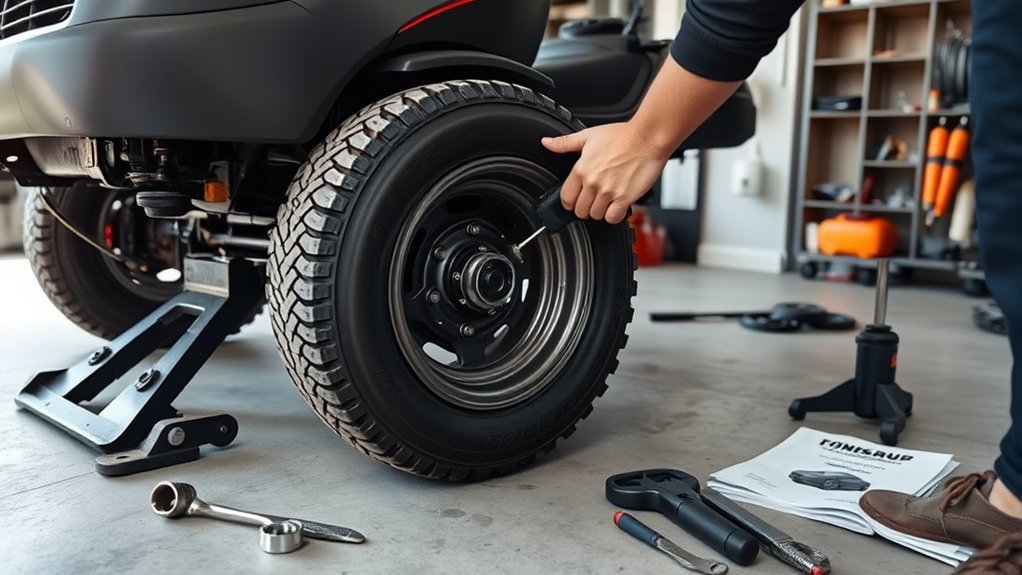
How to Remove the Old Lawn Mower Tire
Begin by positioning the lawn mower on a flat surface and engaging the parking brake so it cannot roll while you work. Before you remove the old tire, disconnect the spark plug to prevent accidental starts while changing a lawn mower wheel. Then deflate the tire by pressing the valve stem pin; less pressure makes separation easier and safer. Use a socket wrench to loosen the axle bolt, and keep the hardware in order as you go.
Position the mower on level ground, engage the brake, and disconnect the spark plug before removing the wheel.
- Pull the retaining ring or C-clamp off with needle-nose pliers.
- Tap the wheel gently with a rubber mallet if it sticks to the axle.
- Store the bolt, ring, and washers together for clean reassembly.
Once the wheel comes free, inspect the axle for rust, bends, or wear. A reliable spare tire kit will ensure you have the necessary tools for future repairs, so clean it if needed so the next tire fits properly and your mower stays mobile, efficient, and ready for the work ahead.
How to Choose the Right Replacement Tire
Check the tire size on the sidewall, such as 15×6.00-6, so you buy a compatible replacement. Match the tire type to your mower’s setup, whether it’s pneumatic, solid, turf, or lug. Verify the load capacity on the sidewall to make sure the tire can handle your mower’s weight and operating demands. Ensure you select a tire with a 4-ply construction for enhanced durability and performance.
Check Tire Size
A proper tire fit starts with the sidewall stamp: match the size exactly, such as 15×6.00-6, so the replacement works with your mower. Read the tire size on your lawn mower tires before you buy anything. If the numbers don’t match, the wheel won’t seat correctly. Use your user manual to confirm the specified tire size and any tread guidance for your setup.
- Check the sidewall code exactly.
- Verify load capacity for your mower.
- Confirm hub and bore dimensions fit the wheel.
Don’t guess or “close enough” it. A correct tire size keeps the machine stable, protects the axle, and lets you move freely without repair hassles. Compare every marking, then choose the replacement that matches your mower’s requirements.
Match Tire Type
Once you’ve confirmed the size on the sidewall, choose the tire type that fits how you mow. For a lawn mower, pneumatic tires absorb bumps and suit uneven ground, while solid tires resist flats and keep you moving. Turf tires give gentle traction on finished grass, and lug tires bite better in soft soil or steep areas. When replacing, match the tread pattern to your terrain and follow your mower’s manual for any specific guidance. Look at the hub and bore size too, because the tire must mount securely on your wheel. Pick a tire type that supports your workflow, reduces downtime, and keeps maintenance simple. The right choice gives you control, cleaner cuts, and less hassle every time you mow.
Verify Load Capacity
Before you buy a replacement tire, verify the load capacity on the sidewall and make sure it matches your mower’s manual. The load capacity tells you the maximum weight each tire can safely carry during operation, so don’t guess. A mismatch can cause tire failure, poor handling, or mower damage. Check your manual for the required rating, then compare it to the tire’s listed pounds-per-tire value.
- Match capacity to your mower’s model
- Account for terrain and attachments
- Confirm specs with the manufacturer if needed
Choose a tire that supports your normal workload, especially if you haul bags or mow rough ground. If the numbers aren’t clear, contact a tire specialist before you install anything. That keeps your mower safe and your work free.
Match the Tire Size and Hub Fit

Check the tire size printed on the sidewall of your current mower tire, such as 15×6.00-6, and buy a replacement with the same size to guarantee compatibility. When replacing a lawn mower tire, matching the tire size keeps the wheel centered and preserves clearance around the frame. Next, verify hub fit by measuring the bore size in inches and comparing it with the new tire’s hub. If the bore doesn’t match, the tire won’t seat correctly, and you’ll waste time and money. Some pneumatic and solid tires use different hub requirements, so check your mower manual before you commit. Also confirm the tread pattern suits your terrain: turf-friendly patterns improve control on grass, while deeper lugs help on rough ground. Keep the load rating equal to or higher than the original so you don’t compromise safety or performance. Accurate matching lets you move forward with confidence and keeps your mower working hard, not you. Additionally, ensure the tire’s tread pattern is suitable for your specific mowing conditions to maintain optimal performance.
How to Install the New Lawn Mower Tire
Clean the wheel rim thoroughly, then apply a little soapy water or another tire lubricant to the beads so the new tire slips on more easily. Set the new tire squarely against the rim, then use steady hand pressure to install one bead at a time. Work the bead into the drop center if needed; that gives you more slack and keeps the fit controlled.
- Keep the bead aligned with the rim edge.
- Push evenly around the circumference, not in one spot.
- Check that both beads seat fully before moving on.
Inflate the tire slowly in short bursts, watching the bead rise and seal uniformly against the rim. If one side hangs up, stop and reseat it before adding more air. Once the tire holds shape, reinstall the valve stem core and confirm retaining rings, covers, and any loose parts are back in place. You’ve now locked in a reliable install that helps your mower roll free, ensuring optimal performance with turf-friendly tread design.
Reinstall the Wheel and Tighten the Hardware
Slide the wheel onto the axle and align it carefully so it seats straight and won’t wobble in use. Reinstall any washers, retaining clips, and the dust cap you removed, then insert the axle bolt and tighten it with a socket wrench to the manufacturer’s torque spec. Lower the mower and check for any play or unusual movement before you use it. Regular maintenance, including monitoring tire pressure accuracy, ensures optimal performance and safety during operation.
Align Wheel Properly
Position the wheel on the axle with the tire fully seated on the rim, then align the retaining ring and washer holes so they face outward for a secure fit. When you align the wheel, keep the new tire centered so it won’t bind or drag. Tighten the axle bolt with a socket wrench in a crisscross pattern to spread pressure evenly and avoid warping. Check the wheel’s movement before you move on.
- Spin it by hand; it should turn freely.
- Feel for wobble or extra play.
- Confirm the rim stays seated flat.
If anything shifts, stop and reset the fit. A clean, true mount keeps your mower rolling with less friction and more control.
Reattach Washers And Clips
Set the wheel fully on the axle, then realign the washers and retaining clips so every piece seats correctly. You’ll reattach the washers in their original order, keeping the hub centered and stable. If your mower uses a retaining ring or clip, press it back into place with pliers until it locks. Check that the dust cap is reattached too; it shields the axle from dirt and debris. Next, tighten the axle bolt with a socket wrench until the hardware feels firm and the wheel stays secure under load. Don’t overtighten and bind the hub. Finish by spinning the wheel by hand. It should turn freely, with no scrape, wobble, or drag. If it hesitates, stop and correct the fit before lowering the mower.
Tighten Axle Hardware
With the wheel and hardware back in place, align the axle bolt properly with the wheel hub so the assembly seats straight. Use a socket wrench to tighten axle hardware and securely tighten the axle bolt to the manufacturer’s torque spec. Don’t guess—too much torque can bind the wheel, and too little can let it loosen in use.
- Recheck that washers and retaining clips sit flat and fully engage.
- Turn the axle bolt evenly, keeping the wheel centered.
- Spin the wheel after tightening to verify free rotation and no wobble.
If you feel drag, back off and correct the fit before you mow. A precise install keeps the wheel stable, protects the axle, and lets your mower move freely.
How to Inflate the Tire Correctly
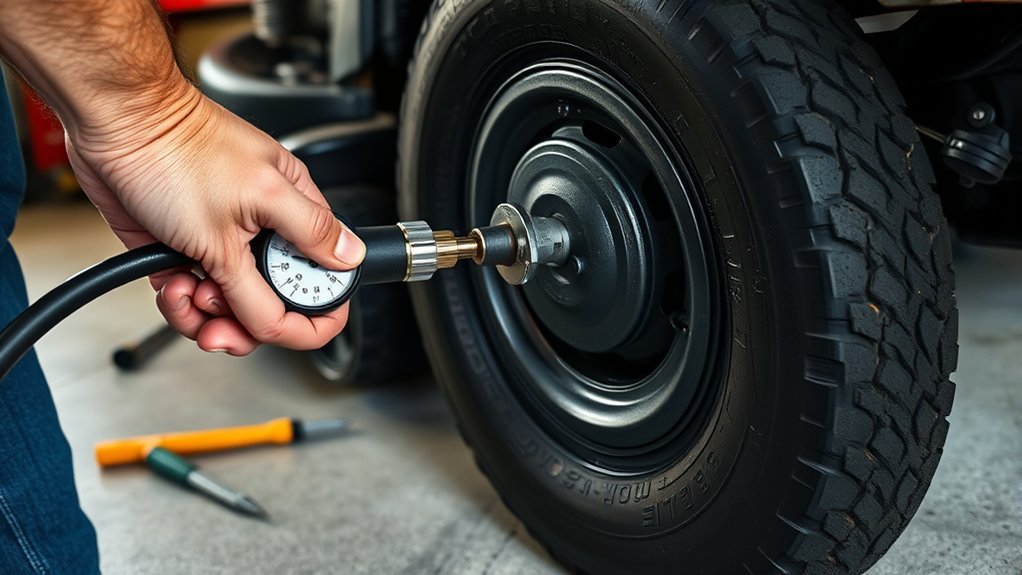
Check the tire’s sidewall for the recommended PSI, then use a tire pressure gauge to measure the current pressure before adding air. Match your tire pressure to the maker’s range so the mower rolls freely and cuts cleanly. To inflate, attach an air compressor or hand pump to the valve stem and press it down firmly to seal the connection. Add air in short bursts, then check the gauge again; don’t guess. If you overshoot, release a little air through the valve stem core and recheck. Repeat until the PSI hits spec. When you finish, remove the inflator, cap the stem, and inspect the tire’s tread and sidewall for cuts, bulges, or wear. A properly inflated tire gives you control, reduces drag, and keeps you from wasting effort pushing against underinflation. Additionally, proper tire pressure ensures optimal performance and safety while using your mower.
Do Lawn Mower Tires Need Balancing?
Once the tire is inflated to spec, you usually don’t need to balance a lawn mower tire after replacement. New tire flat? That’s rare on lawn mowers, because tire design and low operating speed already limit vibration. Pneumatic tires spread weight evenly, so minor irregularities don’t matter much in service.
Once inflated to spec, most lawn mower tires don’t need balancing after replacement.
You can usually skip balancing if:
- the tire is new and seated correctly
- the wheel hasn’t been removed and reinstalled
- inflation matches the sidewall spec
If you repaired a tire or reassembled the wheel, check for obvious wobble, but don’t overcomplicate it. Balancing on lawn mowers is a precision step, not a default requirement. Keep the tire properly inflated, inspect tread wear, and stay on top of routine maintenance. That’s how you keep the machine running freely, without wasting time on unnecessary balancing tasks. Additionally, proper tire maintenance is crucial for ensuring optimal performance and longevity.
Troubleshoot Common Tire Replacement Problems
If the new tire won’t fit the rim, clean both surfaces and wet them with soapy water so the bead can slide on more easily. When you change a lawn mower tire, troubleshoot fit issues before forcing parts together; gouging the rim can turn a usable wheel damaged beyond repair. If leaks persist, inspect the bead for full seating and check the rim and tire for cuts, cracks, or bent edges. During inflation, if the bead won’t snap into place, wrap a ratchet strap around the tread and tighten it to push the sidewalls outward, then inflate slowly. For a stuck retaining clip or washer, apply penetrating lubricant like WD-40 and wait a few minutes before removal. After assembly, confirm the axle and wheel align squarely; misalignment causes drag, uneven wear, and poor cut quality. Additionally, consider using a tire repair kit for quick fixes to punctures that may arise during use. Work methodically, and you’ll keep control of the repair instead of surrendering to stubborn hardware.
Frequently Asked Questions
How to Change a Tire Step by Step Guide?
You change a tire by parking safely, loosening lug nuts, lifting the vehicle, removing the wheel, swapping the tire, then tightening and lowering it. Your tools needed include a jack, wrench, and pressure gauge. Follow tire maintenance tips by checking pressure and sealing. Avoid common mistakes like overtightening or skipping support. You’ll work faster, stay safer, and keep control. Check everything before driving.
Can You Change Lawn Mower Tires at Home?
Yes—you can change lawn mower tires at home. Like swapping a single worn chess piece to restore the board, one replacement can revive your mower. You’ll need a jack, socket wrench, and pliers, plus a tire selection guide to match size. Follow tire maintenance tips, disconnect the spark plug, and wear gloves and eyewear for lawn mower safety. You don’t need to balance the new tire, so you stay independent.
What Direction Do You Turn the Bolt to Loosen a Lawn Mower Blade?
You turn the blade bolt counterclockwise to loosen it. That’s the standard lefty-loosey direction. Use common tools needed like a socket wrench or tire iron, and lock the blade with a wood block. These blade tightening methods help you break torque safely. Engage the parking brake, disconnect the spark plug wire, and apply penetrating oil if it’s rusted. These maintenance tips keep you working freely and efficiently.
How to Lift Tires on a Lawn Mower?
You lift mower tires by parking on level ground, setting the brake, disconnecting the spark plug, and jacking the frame until the wheel clears, like when you replace a flat on a riding mower in your garage. Use proper lifting techniques, place jack stands under the frame, and follow equipment safety rules. Check the manual for jacking points, then inspect the tire. These tire maintenance tips keep you independent and safe.
Conclusion
Changing a lawn mower tire is easier than it looks when you follow the right steps. Once you secure the mower, match the correct replacement tire, and tighten everything properly, you can get back to mowing fast. Inflate the tire to the recommended pressure and check for fit issues before you start. A smooth, safe repair can feel like a miracle for your yard work. Keep your tools handy, and you’ll handle future tire swaps with confidence.
Related Articles

How Long Does It Take to Get a New Tire? Time Guide by Vehicle
Mighty fast or surprisingly long—discover how vehicle type changes new tire timing and what most drivers don’t expect next.
Read More
How Much Torque for Tire Lug Nuts? Exact Specs by Vehicle
A quick guide to tire lug nut torque specs reveals why the exact number matters—and what happens if you get it wrong.
Read More
Wheelchair Tire Guide: Sizing, PSI & Care Tips
Just learn the simple ISO sizing, tire types, and maintenance steps to keep your chair rolling—discover step‑by‑step replacement and troubleshooting inside.
Read More