
How to Use Tire Plugs: Step-by-Step Repair Guide in 10 Minutes

First, confirm the puncture is only in the tread, under ¼ inch, and free of bulges, cuts, or cracks. Gather your plug kit, pliers, cement, and compressor. Pull out the object, then use the T-handle reamer to clean and smooth the hole. Insert the plug halfway, push it in, and withdraw the tool. Trim the excess, inflate the tire, and check for leaks with soapy water. Keep going for the finer points.
Key Takeaways
- Inspect the puncture first; only tread holes under ¼ inch are suitable for plug repair.
- Gather a plug kit with reamer, insertion tool, rubber cement, pliers, and an air compressor.
- Remove the object, ream the hole clean, and keep the channel smooth for proper plug seating.
- Insert the plug straight in, leave a small amount outside, then pull the tool out to seat it.
- Trim excess plug, inflate the tire, and check with soapy water for any leaks.
Can You Fix This Tire With a Plug?
Before you plug a tire, inspect the puncture closely to make sure it’s repairable. You can use tire plugs for a tread puncture only if the hole is under ¼ inch and the casing shows no internal damage. First, locate the foreign object and check the area for bulges, cuts, or cracks; these signs mean you need a professional repair, not a quick Flat Tire Repair. If the damage stays in the tread and the structure looks sound, you can proceed with confidence. Remove the foreign object, then use a T-handle Reamer tool to clean and size the hole. Next, insert the rubber plug with a plug tool, making sure it seats fully. After the plug sets, trim the excess plug flush with the tread. Finish by applying soapy water and watching for bubbles. If you see leaks, stop and get the tire inspected by a pro. Additionally, remember that repairs are temporary and may require a professional inspection shortly after installation.
Gather Your Tire Plug Kit
Gather your tire plug kit before you start the repair so you’ve got every tool within reach. Your tire plug kit should include tire repair kit essentials: repair plug strips, a T-handle reamer, a plug installation tool, rubber cement, and pliers. Add a portable air compressor so you can restore tire pressure after sealing the damaged tire. This prep keeps you independent on the road or trail. Having a reliable tire sealant can also help maintain pressure during your repair process.
| Item | Purpose | Check |
|---|---|---|
| Repair plug | Seals puncture | Present |
| T-handle reamer | Prepares hole | Secure |
| Plug installation tool | Inserts plug | Clean |
| Rubber cement | Improves bond | Fresh |
Inspect your kit during routine maintenance, and replace any dried cement or bent tools. Pack everything in one pouch so you can move fast when you need to pull the tool, plug the tire, and get back on your route. A complete kit protects your freedom by turning a roadside problem into a controlled, efficient fix.
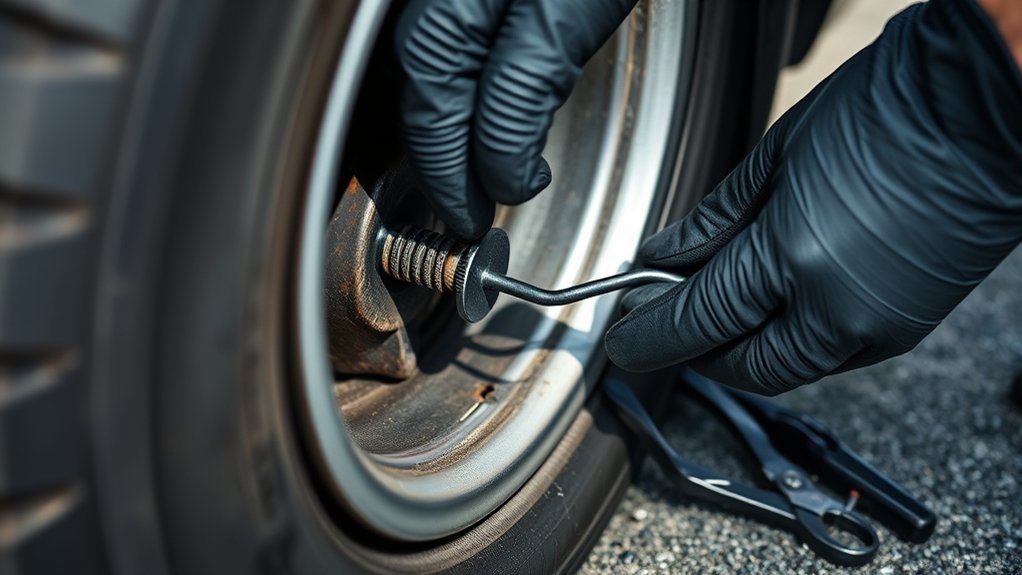
Remove the Object and Ream the Hole
Grip the exposed puncturing object firmly with pliers and pull it straight out of the tire with a steady motion to avoid enlarging the hole. Once you remove the object, you can reclaim control of the repair. Use the T-handle reamer tool from your tire kit to condition the puncture for the plug.
- Insert the reamer into the hole until it grips the inner lining.
- Twist the tool clockwise and counterclockwise to clean the channel.
- Work the reamer through several passes to slightly widen the hole.
- Withdraw it and confirm the path is smooth and free of debris.
Keep your movements deliberate; sudden force can damage the surrounding rubber. A properly reamed hole helps the plug seat with confidence and preserves tire integrity. This step isn’t about speed alone; it’s about precision that frees you from weak roadside fixes. When the hole feels clean, open, and uniform, you’re ready for the next repair step. Remember, effective repairs depend on proper surface preparation, which enhances adhesion and overall repair reliability.
Insert and Seat the Tire Plug
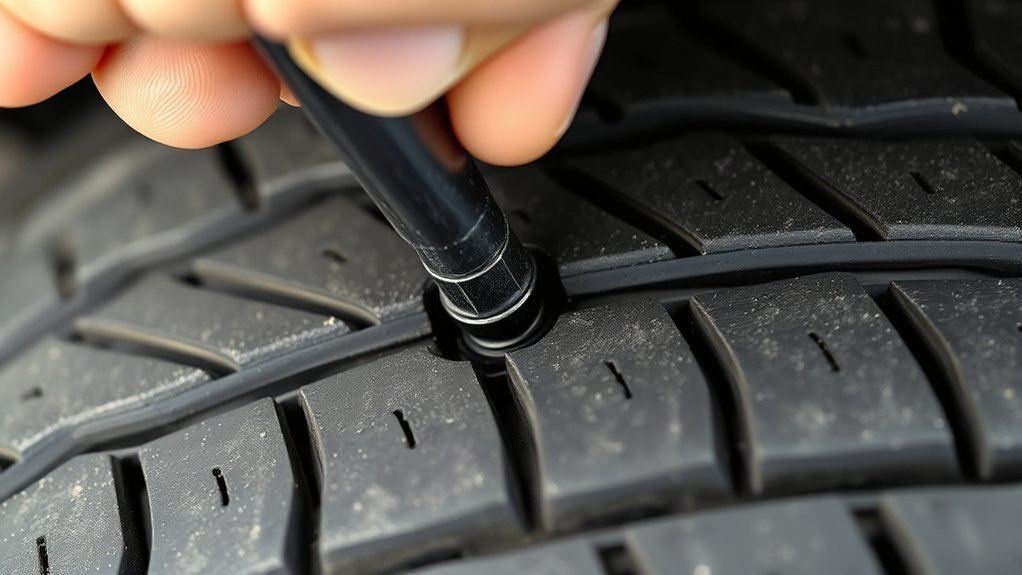
Load the tire plug into the eye of the insertion tool, leaving enough plug exposed to create a solid seal. During tire plug insertion, align the insertion tool with the puncture hole and push the rubber plug straight down. Don’t twist the tool; push straight down to help the plug anchor and form a secure fit inside the repair kit’s repair path. Drive it in until about 1/2 inch remains outside the tire, then quickly pull the plug tool straight out in one smooth motion. That motion leaves the plug seated and ready to hold. If the plug starts to lift, reinsert it and repeat the stroke with controlled force. After seating, inspect the tread for excess plug material. Use flush-cut pliers or a razor blade to trim it flush with the tire surface. Keep the cut clean so the repair stays low-profile and the tread rolls freely without snagging. Remember to check for leaks post-installation using soap solution to ensure a secure repair.
Inflate the Tire and Check for Leaks
Once the plug is seated and trimmed, move on to inflation. Use your tire repair kit, locate the valve stem, remove the cap, and connect the air compressor nozzle firmly. Then inflate the tire in short bursts, watching the gauge until you reach the manufacturer’s recommended pressure. Don’t rush; controlled pressure protects your plug installation and keeps you safe.
- Attach the nozzle securely.
- Inflate the tire gradually.
- Replace the valve stem cap after disconnecting.
- Check for leaks with soapy water.
Apply soapy water around the repaired area and look for bubbles. If bubbles form, air is escaping and the repair isn’t sealed. Recheck the plug installation, then reinflate and test again. If the leak continues, stop and get professional help. This final check confirms the repair, preserves your independence, and lets you drive with confidence. Additionally, remember that using a tire plug kit can enhance your repair effectiveness, ensuring you have the right tools on hand.
Frequently Asked Questions
How to Plug a Tire Step by Step?
You plug a tire by checking the puncture, removing debris, reaming the hole, inserting the plug, and reinflating it. Use tire repair tools from your emergency repair kits, then perform tire safety checks with soapy water. Follow tire maintenance tips, tire pressure monitoring, seasonal tire care, puncture prevention methods, tire longevity strategies, and address common tire issues confidently through DIY tire repairs.
How Long to Let Rubber Cement Dry on a Tire Plug?
Let the rubber cement dry 10–15 minutes before inflating; in humid air, give it longer. You’re a mechanic freeing a trapped wheel: assess the puncture, choose among tire plug types, and use rubber cement application sparingly in tire repair kits. Follow plug installation tips, check tire air pressure, and keep safety precautions. Treat tire maintenance as a bridge—temporary fixes help now, but long term solutions still matter.
How Far Do I Push a Tire Plug-In?
Push the tire plug in until about ¾ of it sits inside the puncture, leaving roughly ½ inch exposed for grip. Different tire plug types need this plug installation depth to seal correctly. Check tire pressure considerations, puncture size limits, and plug durability factors before driving on plugs. Use safety precautions, then trim flush. Keep temporary vs permanent in mind, and use proper plug removal techniques and maintenance tips.
Do You Twist a Tire Plug?
No, you don’t twist a tire plug; you push it straight in. Use plug installation tools, not force, and keep safety precautions outlined. This tire maintenance tips approach fits puncture causes explained, plug types comparison, and temporary fixes overview. Check tire pressure checks, pack emergency kit essentials, and consider professional repair options. You’ll avoid common mistakes avoided, preserve control, and keep your vehicle’s integrity with disciplined, liberated action.
Conclusion
So, you’ve heroically saved your tire with a plug, proving that a nail and a $10 kit can outwit a perfectly good roadside catastrophe. Inflate the tire to spec, then check the repair with soapy water and watch for leaks like a suspicious detective. If the plug weeps, fails, or sits in the sidewall’s forbidden zone, don’t celebrate—replace the tire. A plug is a repair, not a lifetime achievement award.
Related Articles
How to Use Harbor Freight Tire Changer: Full Operation Guide
Navigate Harbor Freight tire changer setup, bead breaking, mounting, and balancing with pro tips that reveal crucial fixes and finer points.
Read More
How to Use a Tire Jack Safely: Step-by-Step Guide
Use a tire jack safely with these essential steps and avoid dangerous mistakes that could leave you stranded.
Read More
How to Use a Tire Changing Machine: Easy Beginner’s Tutorial
Now learn the simple steps to use a tire changing machine safely, and discover the key mistake beginners must avoid.
Read More