
How to Repair a Flat Tire on a Toyota RAV4: A Step-by-Step Guide
To repair a flat tire on your Toyota RAV4, first check for sagging or punctures. Gather your tools: a spare tire, jack, and lug wrench. Park on a flat surface and turn on your hazard lights. Loosen the lug nuts, lift the vehicle with the jack, and replace the flat with the spare, tightening the nuts in a crisscross pattern. After plugging any punctures, confirm the pressure’s correct. Want to know more about safety checks? Keep going for details.
How to Identify a Flat Tire?

How can you tell if your tire is flat? Start by visually inspecting it. If it looks saggy or uneven compared to your other tires, it might be low on air. Check for punctures or embedded objects, which are common tire issues that can lead to air loss. Using a tire pressure gauge is essential; if the reading is considerably below the recommended level, you likely have a flat. Don’t forget to examine the valve stem for cracks or leaks. You can apply soapy water here—look for bubbles forming, as they indicate escaping air. Listen carefully; a hissing sound while inspecting can also point to a slow leak. These tire maintenance tips can help you catch issues before they escalate, ensuring a safer driving experience. Stay alert and proactive about your tires to maintain both performance and safety.
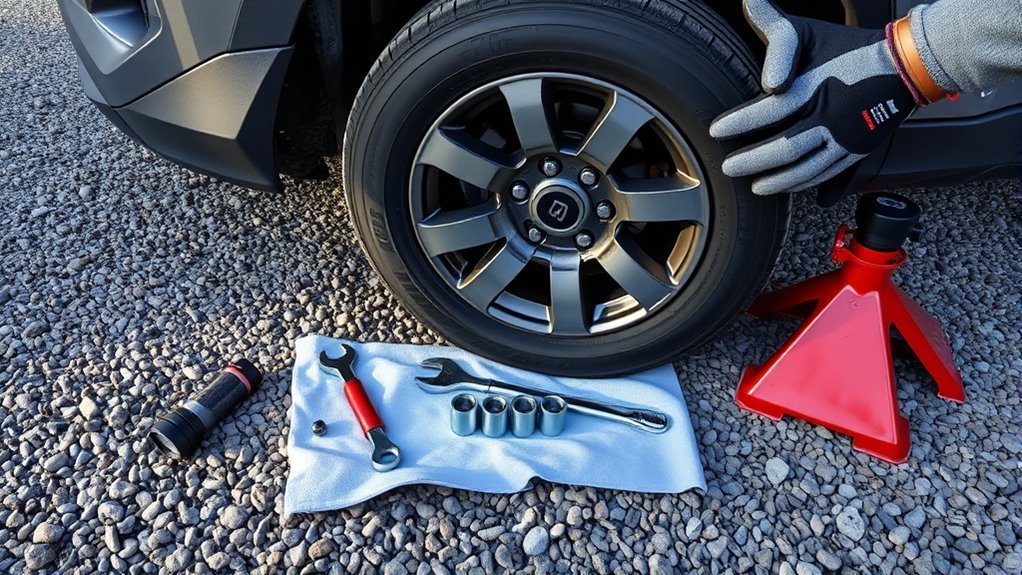
Gathering Tools for Flat Tire Repair
Before you start repairing a flat tire on your Toyota RAV4, gather the necessary tools to guarantee a smooth process. Here’s a quick checklist of what you’ll need:
| Tool | Purpose | Location |
|---|---|---|
| Spare Tire | Replacement for flat tire | Trunk |
| Jack | Lifts the vehicle for tire removal | Under front passenger seat |
| Lug Wrench | Removes and secures lug nuts | Under front passenger seat |
| Tire Pressure Gauge | Checks inflation of spare tire | Emergency kit essentials |
| Tire Plug Repair Kit | Repairs punctures | Emergency kit essentials |
| Blade | Trims excess plug material | Emergency kit essentials |
| Tire Patch Sealant | Seals tight holes during repairs | Emergency kit essentials |
Having these tools handy not only simplifies the process but also enhances your tire maintenance tips for future reference.
How to Change a Flat Tire: Step-by-Step Guide
When you find yourself with a flat tire on your Toyota RAV4, the first step is to confirm the vehicle is parked safely on a level surface, and the emergency flashers are activated for visibility. Next, retrieve the spare tire, jack, and lug wrench from the trunk. Begin by slightly loosening the lug nuts while the vehicle is still on the ground; this makes removal easier once jacked up.
Use the jack to lift the vehicle until the flat tire is off the ground. Remove the loosened lug nuts and take off the flat tire.
Now, install the spare tire by aligning the holes with the wheel hub. Hand-tighten the lug nuts in a crisscross pattern to confirm even pressure. Finally, lower the vehicle and fully tighten the lug nuts to secure the spare. Following these steps not only enhances your tire maintenance skills but also reinforces essential safety tips for handling flat tires.
Flat Tire Repair: How to Plug a Puncture

A punctured tire can often be repaired easily with a tire plug, saving you time and money. First, locate the puncture by inspecting the tire visually or using soapy water to spot air leaks through bubbles. Once identified, remove the object causing the puncture with needle-nose pliers. Prepare the hole by rasping it for a secure plug fit.
Next, insert the rubberized plug cord into the puncture using the insertion tool, twisting it to guarantee a tight seal, then trim any excess material. After plugging, reinflate the tire to the recommended pressure and check for leaks again with soapy water. Regular tire maintenance, including addressing puncture causes promptly, can extend tire life and enhance safety. Always keep a tire plug repair kit in your vehicle, equipped with a rasp, insertion tool, and sealant for effective roadside repairs.
Final Checks: Ensuring Safety and Proper Tire Pressure
After plugging your tire, it’s important to perform final checks to confirm safety and proper tire pressure. Start by using a gauge to check the spare tire’s pressure, making sure it meets the manufacturer’s recommended PSI. Inspect the valve stem for any cracks or leaks; a faulty valve can cause air loss. Also, visually examine the tire for damage and verify it’s mounted correctly, with the valve stem facing outward.
Here’s a quick reference table for your checks:
| Task | Importance |
|---|---|
| Pressure Check | Confirms ideal performance |
| Valve Stem Inspection | Prevents air loss |
| Visual Damage Check | Confirms tire integrity |
If you’re using a donut spare, remember its maximum speed limit is 50 mph, and it should only be a temporary solution. Regular spare tire maintenance and pressure checks are vital for safety, especially before long trips.
Frequently Asked Questions
How to Fix a Flat Tire Step by Step?
To fix a flat tire, gather your emergency kit, park safely, loosen lug nuts, jack up the car, remove the flat, install the spare, tighten the nuts, and check air pressure. Regular tire maintenance tips guarantee safety.
What to Do if I Have a Flat Tire on My Toyota?
When you have a flat tire on your Toyota, remember: “An ounce of prevention is worth a pound of cure.” Safeguard tire safety by using emergency tools, like the jack and lug wrench, to replace the tire.
Conclusion
You’ve now mastered the art of fixing a flat tire on your Toyota RAV4—it’s like having a superpower! By identifying the issue, gathering your tools, and following the steps to change or repair the tire, you’re well-equipped for any roadside emergency. Don’t forget those final safety checks; they’re essential for your peace of mind. With these skills, you can tackle flat tires with confidence and hit the road knowing you’re prepared for anything!
Related Articles

Upsizing Wheels on a Toyota RAV4: Pros, Cons, and Considerations
Boost your Toyota RAV4's performance with larger wheels, but discover the hidden trade-offs that could impact your ride before you decide.
Read More
Can I Change Tire Size on My Toyota RAV4? Rules and Recommendations
Are you considering changing the tire size on your Toyota RAV4? Discover the essential rules and recommendations before making a decision.
Read More
What to Do If the TPMS Light Comes On in Your RAV4
Understand the steps to take when the TPMS light illuminates in your RAV4, as overlooking it could lead to serious tire problems.
Read More