
Where to Find the Recommended Tire Pressure on a Hyundai Sonata
Look on the driver‑side door jamb sticker — it lists the recommended cold PSI for front and rear tires (and separate values for normal vs fully loaded conditions). Read the sticker when tires are cold and use a calibrated gauge to match the specified front/rear pressures. You can also view per‑wheel pressures on the Sonata’s TPMS display at startup. If the sticker’s missing, consult the owner’s manual or Hyundai’s digital manual for the exact cold PSI and procedures to verify.
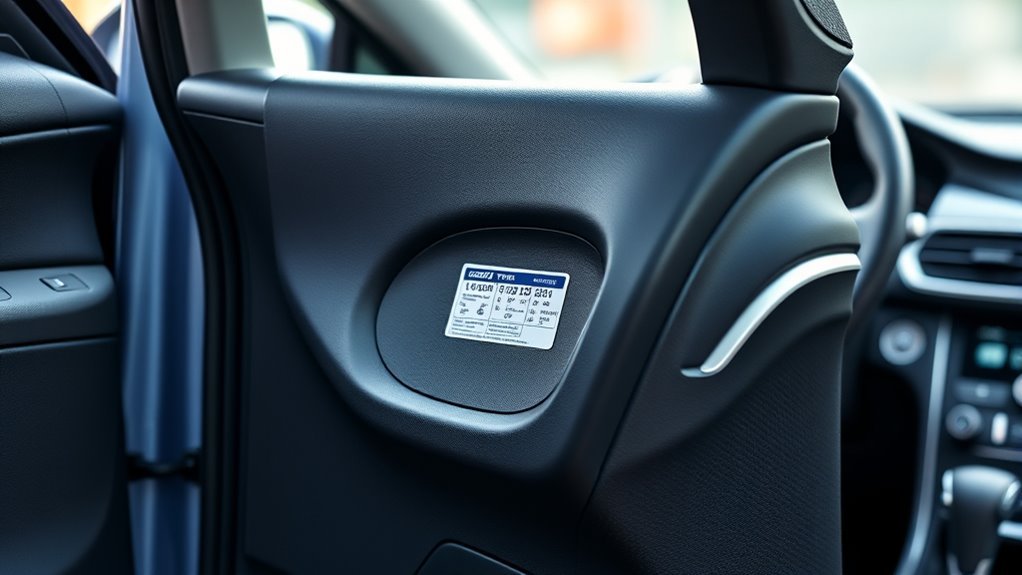
Where to Look First: Driver‑Side Door Jamb Sticker

Check the driver-side door jamb sticker first; it lists the recommended PSI for your Sonata’s front and rear tires and notes differences for normal versus fully loaded conditions. You’ll find precise tire pressure figures there that match your model and trim, so use them instead of the tire sidewall’s maximum value. As you prepare for service or solo travel, consult that sticker before inflating to guarantee consistent handling, fuel efficiency, and even wear.
Treat the sticker as a primary reference in routine maintenance tips: verify pressures when tires are cold, record settings for seasonal checks, and adjust for payload changes indicated on the label. You’ll avoid guesswork, reduce safety risks, and reclaim control over vehicle performance. Keep a reliable gauge and a basic inflator in your trunk; armed with the sticker data and simple tools, you’ll maintain correct inflation and preserve the freedom that comes from dependable, predictable driving.
How to Read the Sticker: Front vs Rear Cold PSI
You’ll find the driver door placard on the driver’s side door jamb and it lists the recommended cold PSI for front and rear tires separately. Read the two values and apply them when tires are cold, since front and rear pressures can differ by load and suspension tuning. Use those placard numbers—not the tire sidewall max—to set inflation for safety, fuel economy, and tire life.
Driver Door Placard Location
On the driver’s side door frame or the edge of the door you’ll find a placard that lists the cold PSI for both front and rear tires; read those values rather than the tire sidewall maximums because they reflect the vehicle’s specific load and handling requirements. Locate the sticker with the door open at eye level; it’s durable, often white or metallic, and concise. You’ll see clear numeric cold PSI entries for front and rear, plus recommended load and tire size. Check pressures when tires are cold for accurate readings. Use a calibrated gauge and set pressures to the placard’s values to preserve vehicle safety and tire life. Follow the placard to stay independent, informed, and in control.
Front Vs Rear PSI
After locating the door jamb placard, read the separate cold PSI values for front and rear tires—these numbers reflect the Sonata’s designed load distribution and handling, so set pressures to those exact figures rather than the tire sidewall maximums. You’ll check pressures when tires are cold (morning or after minimal driving) to match the sticker’s cold PSI. Follow those values to preserve handling dynamics, improve fuel economy, and reduce uneven tire wear.
- Front PSI often differs from rear to support steering feel and braking response.
- Rear PSI compensates for load and stability, balancing handling dynamics across the axle.
- Never use sidewall maximums; they’re not calibrated for the Sonata’s chassis or to prevent excessive tire wear.
How to Check and Set Your Sonata’s Tire Pressure (Quick Steps)
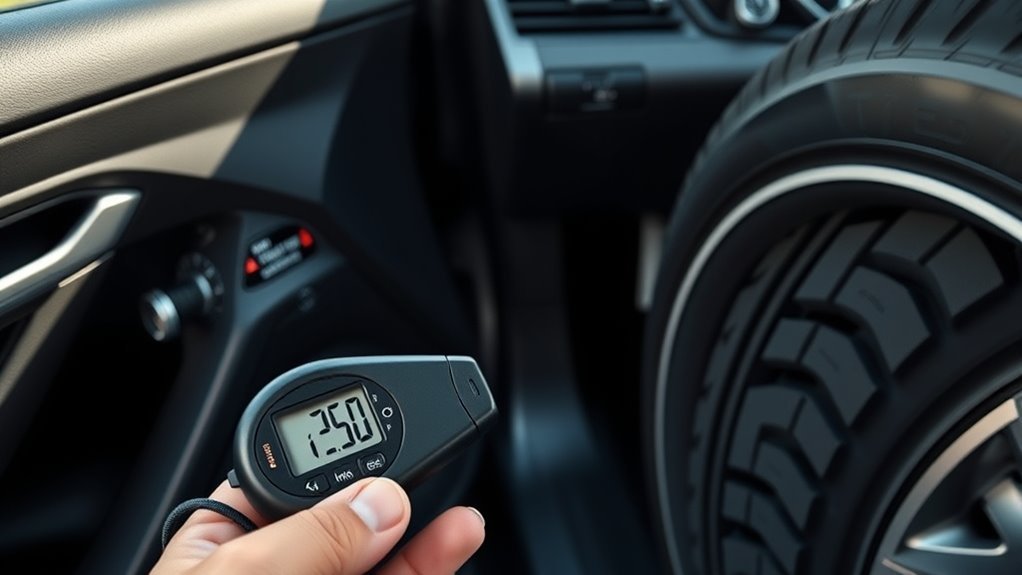
Check your Sonata’s tire pressure with a simple, quick routine: locate the driver’s side door jamb sticker for the recommended PSI, then apply these tire maintenance tips and PSI adjustment guidelines. Do this when tires are cold—ideally in the morning or after minimal driving—to get accurate readings.
Remove each valve cap and press a digital or standard tire pressure gauge firmly onto the valve stem until the gauge registers. Compare readings to the sticker values for front and rear tires. If a tire is low, use an air compressor to inflate it to the specified PSI; if it’s overinflated, release air until it matches the sticker. Adjust all four tires before driving.
After inflating, reinstall valve caps and monitor the TPMS light; it should go off once pressures stabilize, confirming the system’s functioning. Keep a compact gauge and portable compressor in your trunk so you can act quickly and maintain control of your vehicle’s safety and efficiency.
View Hyundai Sonata Tire Pressure With the TPMS Display
Now that you know how to measure and set tire pressures manually, you can monitor them continuously using the Sonata’s TPMS display. The system gives you real-time tire pressures for each wheel once the vehicle’s in motion, reinforcing TPMS functionality and tire pressure importance so you can act decisively. On initial start you’ll also see cold tire pressure readings, which are key for accuracy.
Use the instrument-cluster controls (Up/OK/Down) to access the TPMS screen via trip or fuel economy menus. The TPMS light will illuminate if any tire’s notably underinflated, prompting immediate attention so you’re not trapped by avoidable risk.
- Navigate with Up/OK/Down to view individual tire pressures in real time.
- Rely on cold readings at start-up for baseline accuracy and valid comparisons.
- Treat the TPMS warning light as an urgent indicator to inspect and correct pressure.
This setup empowers you to maintain safe, efficient tires and preserves your freedom on the road.
TPMS Not Showing Cold Readings? Quick Fixes & Why Driving Helps
If your Sonata’s TPMS doesn’t show cold pressures right away, don’t panic — the sensors often need the car to move a short distance (about 1/8 mile) so centrifugal force activates the modules and the display populates with individual tire readings. Drive slowly and watch the dash; once moving the system typically wakes and lists each tire.
For quick TPMS troubleshooting tips, confirm the TPMS warning lamp isn’t indicating low pressure first — a fault or genuine low tire will prevent normal readouts. Remember cold pressure effects: ambient temperature drops lower static pressures and can delay or skew initial readings. If the display still won’t populate after driving, stop and visually inspect tires, top off pressures to recommended values, then drive again to let the sensors recalibrate. Regular short drives after temperature changes help the system stabilize, giving you accurate, actionable pressure data so you can maintain safety and independence on the road.
After Rotating Tires: Check Sensor Positions & Readings
After rotating the tires, confirm each TPMS sensor is mounted at the tire location it’s assigned to so the system can identify positions correctly. Follow the owner’s manual relearn procedure to register sensors to their new wheel locations. Finally, verify cold pressure readings at each wheel to catch any misaligned sensors or pressure issues before driving.
Confirm Sensor Positions
Because rotating tires changes each wheel’s physical location, you should confirm that the TPMS sensors are reporting from the correct positions and that the displayed pressures match each tire. Check sensor identification and sensor calibration to ascertain readings are reliable; mismatches can leave you vulnerable on the road. Use the vehicle display and a handheld gauge to cross-verify pressures and note any discrepancies.
- Verify each wheel position on the display while the car is stationary; confirm front-left, front-right, rear-left, rear-right mapping.
- Compare displayed PSI to manual gauge readings; flag differences exceeding manufacturer tolerance.
- If the TPMS light stays on or IDs don’t match, consult the owner’s manual for targeted reset steps to restore accurate monitoring.
Relearn TPMS Procedure
When you’ve rotated the tires and confirmed sensor positions, relearn the TPMS so the vehicle maps each sensor to its new wheel location; this usually requires driving about 10 minutes at speeds above 15 mph while all tires are set to the recommended PSI. You’ll liberate yourself from false warnings by ensuring sensor synchronization and verifying the system adapts to new wheel locations. Some models auto-relearn; others need TPMS tools to manually register each sensor. Check the owner’s manual for model-specific steps. Start with correct pressures, initiate any required manual reset, then drive steadily until the TPMS confirms. Below is a visual prompt to help you remember the sequence.
| Step | Action |
|---|---|
| 1 | Set PSI |
| 2 | Confirm sensors |
| 3 | Use TPMS tools |
| 4 | Drive 10 min |
| 5 | Verify sync |
Verify Cold Pressure Readings
If you’ve just rotated the tires, verify cold pressure readings by checking each wheel’s TPMS display or gauge while the car’s been stationary for at least three hours (or driven less than one mile). You’ll confirm sensor positions and guarantee the TPMS reports accurate cold pressure before you adjust to the Hyundai-specified PSI on the driver’s door jamb. Use a quality gauge to cross-check electronic readouts; electronic sensors can lag or misreport after rotation.
- Check sensor IDs/positions and note any discrepancies immediately.
- Measure cold pressure with a handheld gauge, then set each tire to the recommended PSI.
- If the TPMS light stays on after adjustment, reset the system or inspect for a faulty sensor.
This is essential tire maintenance for freedom and control.
Can’t Find the Sticker? Use the Owner’s Manual or Digital Copy
Can’t find the tire pressure sticker on your Hyundai Sonata? If the driver’s side door jamb is covered or the sticker’s missing, turn to the owner’s manual for the manufacturer’s recommended PSI for front and rear tires. For quick access, download the digital manual from Hyundai’s official website; it contains the same specifications and clear, technical guidance on checking and adjusting pressure. Use those numbers for accurate inflation—don’t rely on the tire sidewall’s maximum PSI. The manual also gives step-by-step instructions and safety tips for measuring cold pressure and using a gauge correctly, supporting proactive tire maintenance. If you want autonomy over your vehicle care, the manual empowers you to identify proper pressures and perform adjustments with confidence. Keep a copy on your phone or print a page to store in the glovebox so you can access essential specs anytime and maintain consistent, manufacturer-approved inflation for peak performance and safety.
Frequently Asked Questions
What Tire Pressure Should I Use for Heavy Loads or Towing?
You should increase tire pressure per heavy load adjustments—typically 2–5 psi above normal, checking vehicle placard for exact values; follow towing safety tips, monitor temps and wear, and adjust before departure to maintain control and freedom.
Can I Use Nitrogen Instead of Regular Air in Sonata Tires?
Yes — you can use nitrogen; studies show it reduces pressure loss by about 25%. Nitrogen benefits include steadier pressure and slower oxidation. You’ll maintain tires better with regular tire maintenance and periodic pressure checks for freedom.
How Often Should I Replace Worn Tire Pressure Sensors?
You should replace worn tire pressure sensors every 3–7 years or immediately if warning signs appear. For sensor maintenance tips, monitor inconsistent readings, frequent TPMS alerts, or physical damage, and schedule prompt replacement to regain driving freedom.
Do Winter Temperatures Require Different Tire Pressures?
Yes — cold lowers pressure, so you’ll need tire pressure adjustments to maintain ideal PSI; check and top off when temperatures drop, ensuring winter driving safety while you stay liberated and confidently in control of vehicle performance.
Will Aftermarket Wheels Change Recommended Tire Pressure?
Yes — aftermarket wheels can change recommended tire pressure. You’ll assess aftermarket wheel effects on load and tire size, then make precise tire pressure adjustments to preserve handling, safety, and efficiency while freeing your driving experience.
Conclusion
Check the driver‑side door jamb sticker first — it gives the cold PSI for front and rear tires and is your authoritative spec. If you can’t find it, consult the owner’s manual or digital copy. Use a calibrated gauge to set cold pressures and verify readings on the Sonata’s TPMS display. After rotating tires, confirm sensor positions and TPMS values. Remember: measure before you move — a stitch in time saves nine.
Related Articles
What Tread Depth Prevents Hydroplaning on Hyundai Sonata Tires?
Keep your Hyundai Sonata safe from hydroplaning by knowing the crucial tread depth—discover the details that could save you in wet conditions.
Read More
Why One Hyundai Sonata Tire Loses Air Faster Than the Others
Many factors can cause one tire on your Hyundai Sonata to lose air faster—could a simple check reveal the underlying issue?
Read More
Best Hyundai Sonata Tire Pressure for Highway Driving (PSI Tips)
Fine-tune your Hyundai Sonata for highway confidence with optimal PSI tips—discover the exact front/rear pressures and quick checks that transform handling.
Read More