How to Change a Tractor Tire Inner Tube: Full Walkthrough

You’ll first decide whether to patch a small, clean puncture or replace a worn or heavily damaged tube, then gather tools and safely jack the tractor on level ground with chocks and stands. Remove the wheel, fully deflate the tire, inspect tube, tire, and rim, and preinflate and talc the new tube before seating the valve stem. Seat the bead and inflate slowly, check for leaks, torque lug nuts, and perform a brief safety test—keep going to get full step-by-step procedures.
Quick Answer: Repair Vs. Replace the Inner Tube

Decide quickly by inspecting the tube: if the puncture is small and clean, patching it will usually save you money and time; if the damage is large, torn, or the rubber is aged and cracked, replace the tube. You’ll favor repair when you spot a single, localized hole and the surrounding rubber’s sound. Repair benefits include lower cost than a new tube (professionally installed replacements can run about $66.61) and community-backed satisfaction from DIY fixes. Use a patch that overlaps the injury by at least ½ inch to restore functionality and promote tube longevity. Prioritize safety: if multiple punctures, ragged tears, or dry-cracked rubber appear, don’t risk a temporary fix—replace it.
Gather Tools & Jack the Tractor Safely
Start by gathering the right tools and planning the lift so you can work safely and efficiently. Collect pliers, a tire iron, rubber mallet, valve core removal tool and a lug wrench, and confirm your jack is rated for the tractor’s weight. Check tool maintenance—clean, lubricate moving parts and inspect for damage—before you start. Park on level ground, engage parking brake and chock opposite wheels. Identify designated jacking points in your manual and position the jack accordingly; use jack stands if available. Follow safety precautions: never work under a tractor supported only by a jack and keep bystanders clear. Keep removed lug nuts and small parts in a labeled container so nothing gets lost before you lower the tractor.
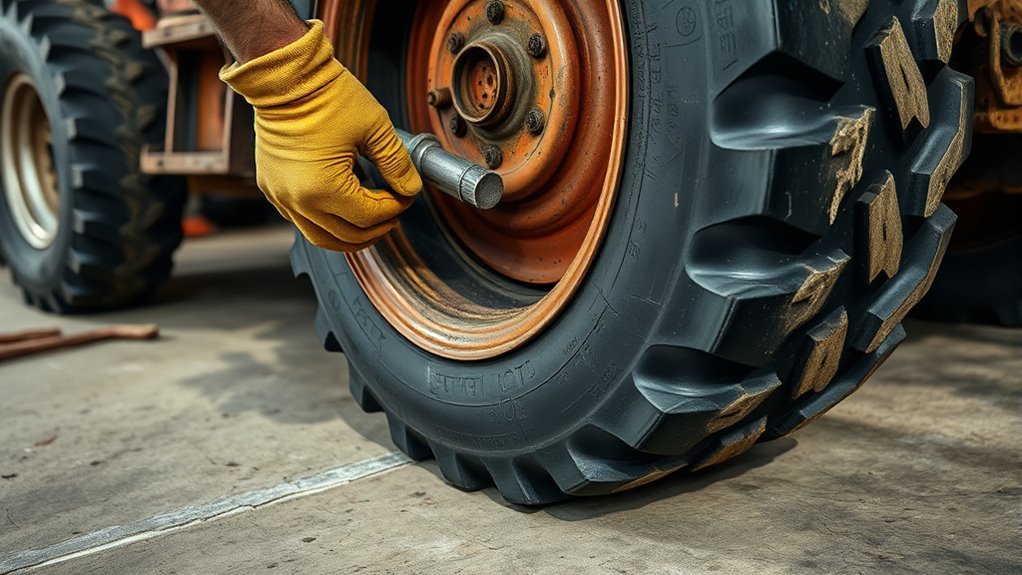
Remove the Wheel and Fully Deflate the Tire
Raise the tractor at the designated jacking point, secure it with jack stands and chock the opposite wheels, then loosen and remove the lug nuts with a lug wrench, keeping them in a labeled container. Confirm the tractor is stable before completing wheel removal: finish unscrewing lug nuts, pull the wheel straight off the hub, and set it on a clean, flat surface. For tire deflation, remove the valve stem core with a core tool to release all air; wear eye and hand protection and stand clear of the bead area. Wait until no air escapes and the tire is fully deflated before handling further. Keep lug nuts and any small parts together, and don’t rush—safety and orderly wheel removal prevent injury and lost components.
Inspect the Tube, Tire, and Rim for Damage
With the tube out, inflate it briefly so you can spot punctures, stress cracks, or other damage. Carefully check the tire for cuts, stretching, and any foreign objects inside that could puncture a new tube. Inspect the rim for dents, sharp edges, or corrosion that might compromise a safe seal.
Inspect Tube Carefully
Inflate the removed tube slightly so you can spot punctures, stress cracks, or stretched areas more easily; then run your hands slowly around it and hold it up to the light to catch small nicks or abrasions. You’re checking tube durability—look for thin spots, splits, or areas that feel soft. If you find a tear, buttonhole each end with a 1/16-inch-diameter cut to stop it running before you patch. Mark all defects and note their size and location. Deflate the tube before beginning any patching to work safely. While you inspect, keep puncture prevention in mind: remove embedded debris and verify the valve stem area is undamaged. Don’t ignore marginal damage; replacing a compromised tube is safer than risking failure.
Check Tire And Rim
Start by fully deflating the tire and removing the tube so you can inspect each component clearly and safely. Once the tube’s out, inflate it slightly to reveal punctures, stress cracks, or weak spots. Check the tire interior for embedded debris, sharp edges, or stretching that could repeat the failure. Examine the rim closely for bending, nicks, corrosion, or rough bead seats that compromise rim safety and proper seating. If you find damage, replace the offending part—don’t patch questionable rims.
- Relief: spotting a tiny shard now prevents a disastrous blowout later.
- Confidence: a clean rim and sound tire make future tire maintenance straightforward.
- Caution: a bent rim can ruin a new tube in minutes—replace it.
Prep the New Inner Tube: Sizing, Pre-Inflation, Talc
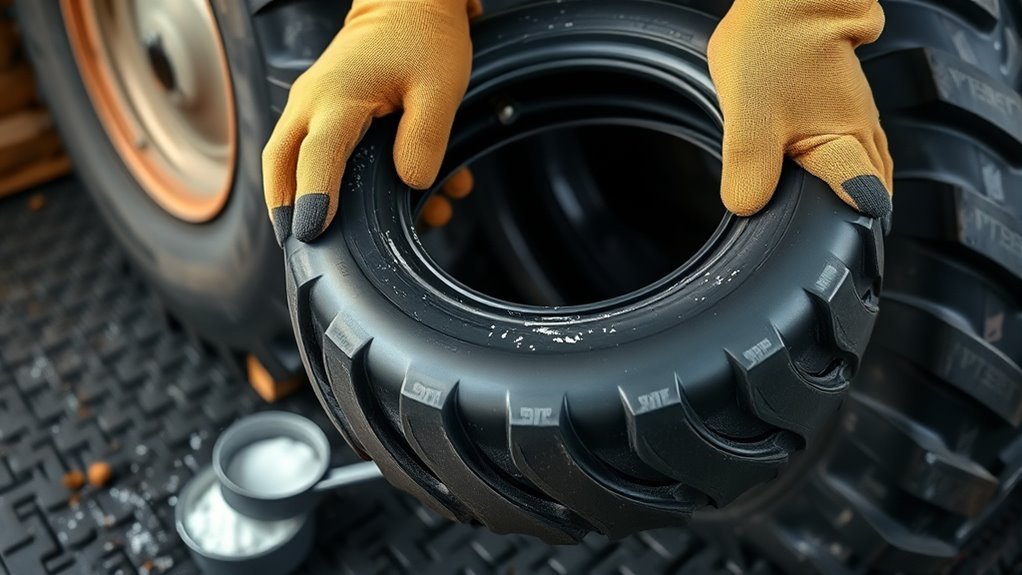
Before you fit the new inner tube, confirm the tube size against the tire sidewall markings—tubes stretch and one tube can cover several sizes—so you don’t end up with a wrong fit that causes pinches or blowouts. Check tube compatibility with the tire and rim; matching ranges avoids overstretching or slack that leads to failure. Pre-inflate the tube just enough to give it shape—this eases installation techniques and prevents folds or wrinkles that can pinch. Dust the tube lightly with baby powder or tire talc to reduce friction and help it slide into place. After shaping, deflate partially so it’s flexible but still holds form. Keep the valve oriented correctly as you prep to guarantee proper seating and to avoid leaks.
Install the Inner Tube and Seat the Valve Stem
Preinflate the tube just enough so it holds shape, then dust it with talc and work it evenly around the wheel so it sits without twists. Line the valve stem up with the rim hole and push it through squarely to prevent leaks. Seat the tire bead over the rim carefully, keeping the valve straight, then inflate slowly while checking the bead on both sides.
Preinflate And Position Tube
Loosely inflate the new tube just enough for it to hold shape, dust it with baby powder or tire talc, then slip it into the tire so the valve stem lines up with the rim hole—make sure the tube lies flat without twists or folds before you deflate it fully and begin seating the bead. Use basic tube maintenance tips: slight preinflation prevents wrinkles, powder reduces friction, and alignment avoids leaks. Work slowly, keeping the tube centered on the rim. Before final inflation, double-check for pinches or folds. Inflate gradually while observing bead seating on both sides to prevent bulges or sudden blowouts. These installation techniques minimize damage and keep you safe.
- Relief — knowing it’s correct
- Confidence — a secure fit
- Safety — reduced risk of failure
Seat And Align Valve Stem
Start by seating the tube so the valve stem sits straight through the rim hole — pull it gently until it’s perpendicular to the rim and aligned with the opening to prevent twisting during inflation. Check valve alignment visually and by feel; a crooked stem can cause leaks or damage. Dust the tube with baby powder to reduce sticking, then preinflate slightly to remove tube wrinkles and help the tube settle. Pull the stem gently as you work the bead on, watching for kinks or folds. Once seated, confirm the stem remains straight and the tube lies smooth before full inflation. Inflate gradually, rechecking alignment and wrinkles, and stop if you sense resistance or misalignment.
| Calm | Confident |
|---|---|
| Safe | Steady |
| Sure | Secure |
| Ready | Reliable |
Seat the Tire Bead and Slowly Inflate While Checking
Set the tire on the rim so the bead sits evenly on both sides, then inflate slowly to the manufacturer’s pressure while watching the bead line carefully to make sure it seats without popping off. You’ll focus on bead alignment and proven inflation techniques: use low pressure first, watch both beads, and stop if one lags. Apply soapy water around the bead if it feels stuck; bubbles show leaks and help seat the bead. Inflate in short bursts, pause to confirm even seating, and listen for any hissing. If the bead looks uneven, deflate slightly and realign before continuing. Finish by checking both beads and the valve stem at full pressure.
Seat the bead evenly, inflate slowly in short bursts, watch for leaks, realign if uneven, then confirm full pressure
- Relief — bead pops into place
- Confidence — even seating confirmed
- Safety — no sudden bursts
Patch Small Punctures: Step-by-Step Cold Vulcanizing Repair
Inspect the tube by inflating it slightly so you can locate the puncture or stress crack, then mark the area and relieve the air before you begin repairs. Prepare by buttonholing the injury with 1/16‑inch holes at both ends, choose a patch that extends at least ½ inch beyond the damage, and assemble patch materials and tools.
| Step | Action |
|---|---|
| 1 | Clean with pre‑buff cleaner |
| 2 | Buff to smooth surface |
| 3 | Apply cold vulcanizing fluid |
| 4 | Center patch, press with stitcher |
| 5 | Test with slight inflation |
Avoid contamination from air or cloths. Let the fluid dry until tacky, then press firmly and use a tire stitcher. Inflate slightly to check for leaks and dust with tire talc to prevent chafing. These repair techniques prioritize safety and longevity.
Final Checks, Torque Lug Nuts, and Safety Test
With the tube repaired and seated, finish by inflating the tire to its recommended working pressure and then checking bead seating and the patch area for any leaks or irregularities. Let it sit a few minutes, then recheck pressure to confirm it holds. Perform final inspections of the valve stem and patch with soapy water; bubbles mean you need to deflate and reseat or repatch. Torque lug nuts in a criss-cross pattern to the manufacturer’s spec—typically 80–120 ft·lbs—to guarantee even distribution and secure attachments. After the first short use, re-torque and check periodically. Finally, run a brief safety test at low speed, listen for air loss, and visually confirm bead seating and fastener security before returning to full operation.
Inflate to spec, inspect for leaks, torque lugs criss-cross, recheck after a short test ride for safe operation
- Relief—you’re nearly done.
- Confidence—everything’s tight.
- Safety—ride home secure.
Frequently Asked Questions
What Does the Blue Line on an Inner Tube Mean?
The blue line on an inner tube marks valve stem alignment and size cues; you’ll use inner tube markings to orient the tube, because tube color significance helps prevent pinching, misalignment, and potential leaks for safer installation.
How to Remove Tractor Tires From Rim?
You’ll deflate the tire, use a bead breaker to separate bead, then pry the tire off with spoons, inspecting for damage. Follow tire maintenance tips and rim cleaning techniques, wear PPE, and work slowly for safety.
Conclusion
You’ve gone from stubborn flat to road-ready: mud-splattered patience beside gleaming new rubber. Keep repair versus replace decisions pragmatic, tools handy, and torque specs exact—small punctures get patched, big tears get swapped. Never rush the jack or skip wheel inspection; safety beats haste every time. After seating the bead and slowly inflating, re-torque lugs and test at low speed. Store spares and talc; come back prepared, calm, and confident.
Related Articles

How to Read Motorcycle Tire Size: Complete Breakdown
Often misunderstood, this guide decodes motorcycle tire sizes like 180/55ZR17—learn what each number and letter means to ensure safe, perfect fitment.
Read More
How to Read Bicycle Tire Size: Inches, Metric & ISO
Get the essential trick to decoding ETRTO/ISO codes so you’ll always pick rim-compatible tyres—discover what to check next.
Read More
How to Read Tire Size Numbers: Decode the Sidewall
Step-by-step guide to decode tire sidewalls—sizes, load, speed, DOT and winter symbols—so you’ll know what fits and when to replace.
Read More