
Tubeless Sealant Injector Review: Efficiency Unleashed
Beanewone Tubeless Sealant Injector Review
Adding sealant to a tubeless bike tire can get messy fast, especially when you need a measured amount and do not want sealant running down the rim. The Beanewone Tubeless Sealant Injector is a 150mL syringe-style tool made to pull sealant from a bottle and push it through a Presta or Schrader valve after the valve core is removed. In this review, you will see where it works well, where it may struggle, and whether it makes sense for your home bike maintenance kit.
Quick Verdict
Rating: Recommended with caveats, 8.3/10
Best For: Riders who refresh tubeless sealant at home and want cleaner measuring than pouring from a bottle.
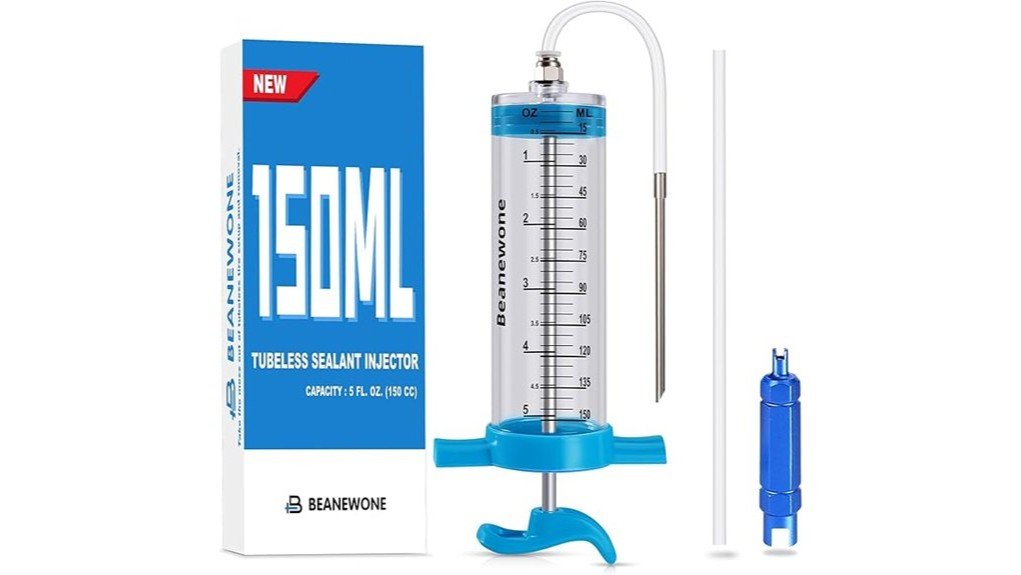
Bottom Line: The Beanewone BE-ZSQ-150 gives you a large clear 150mL body, a 20cm tube, and a valve core remover in one low-cost kit. It is most useful with standard tubeless sealants, while thick or chunky formulas may need more patience and cleaning.
[Products Worth Considering]

Convert Presta bicycle valves to accept standard Schrader pump nozzles for fast, hassle-free inflation. This kit includes durable brass adapters with leak-resistant connections, plus sports inflation needles and protective valve caps for convenient use on bikes and ball sports equipment.

This 4-pack kit converts Presta bike valves to standard Schrader valves so you can inflate with any regular pump or air compressor. The solid brass adapters include an O-ring for a tight, leak-proof seal and provide a simple screw-on setup. Compatible with road bikes, mountain bikes, e-bikes, and e-scooters, it’s designed for convenient, everyday carry readiness.
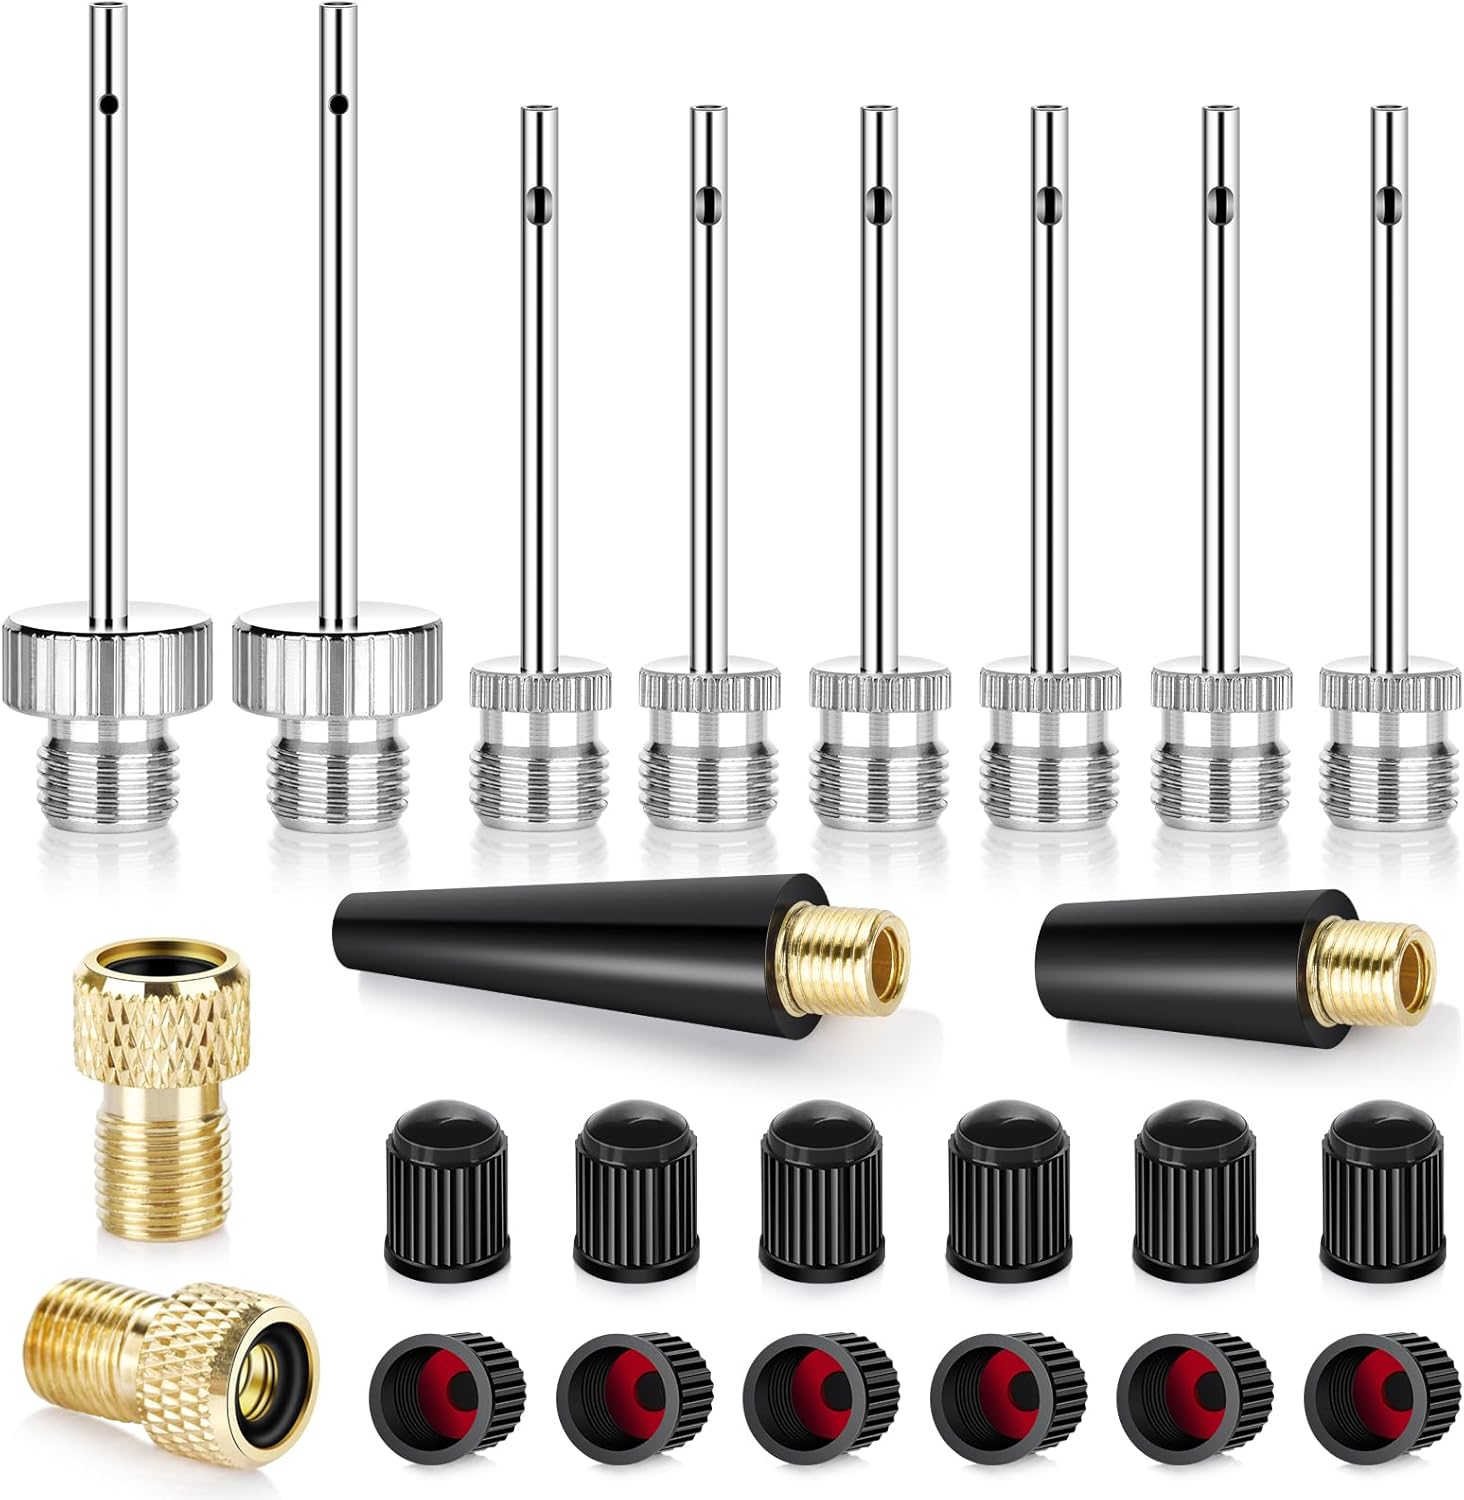
This ball pump needles kit includes brass ball needles for inflating footballs, soccer balls, basketballs, and volleyballs, plus conical nozzles for air mattresses, exercise balls, balloons, and swim rings. It also offers Presta to Schrader valve adapters for easy use with compatible bikes and rideables. The set includes sealed valve caps and a storage case, helping keep your equipment organized and ready to inflate quickly.
Key Specs
| Specification | Detail |
|---|---|
| Brand | Beanewone |
| Model / Part Number | BE-ZSQ-150 |
| ASIN | B0D66B7W52 |
| Product Type | Tubeless bike tire sealant injector |
| Design | Syringe-style injector with push-to-connect fitting and flexible tube |
| Capacity | 150mL |
| Material | Clear polycarbonate body with brass metal shaft and tip |
| Color | Blue |
| Tube Length | 20cm / 7.8in |
| Valve Compatibility | Presta and Schrader valves, with the valve core removed before injection |
| Included Components | 150mL sealant injector, 20cm tube, valve core remover tool |
| Item Dimensions | 7.48 x 3.74 x 2.17 inches |
| Package Dimensions | 8.27 x 3.62 x 2.13 inches |
| Package Weight | 0.16kg |
| Number of Items | 1 |
| Manufacturer Listed | Shanxi Purple Shark Technology Co., Ltd. |
| Warranty Listing | Amazon technical details list a two-year warranty. Check current seller terms before buying. |
| Best Use | Home tubeless tire setup and sealant refreshes for bikes using removable valve cores |
What Is the Beanewone Tubeless Sealant Injector?
The Beanewone BE-ZSQ-150 is a tubeless bike tire sealant injector. It is designed to move tire sealant from a bottle into a tubeless tire through the valve stem instead of forcing you to pour sealant into an open tire bead.
The clear 150mL syringe body helps you see how much sealant you have drawn, while the 20cm tube gives you enough reach to connect the injector to the valve. The kit also includes a valve core remover, which matters because sealant flows more cleanly when the valve core is removed before filling.
This is a simple maintenance tool, not a complete tubeless conversion kit. You still need compatible tubeless tires, tubeless-ready rims, valve stems, sealant, an air source, and any rim tape your setup requires.
Who Should Buy It?
Best For
- Mountain, gravel, road, and commuter riders who refresh tubeless sealant at home.
- Bike owners who want measured 150mL capacity instead of guessing from a bottle.
- Riders who need a kit that includes both the injector and a valve core remover.
Skip If
- You rarely service tubeless tires and already have a sealant bottle nozzle that works well.
- You use very thick or chunky sealant formulas that may clog small injector openings.
- You need a heavy-duty shop tool for daily professional service work.
Before You Buy: This injector works best when the valve core is removed and the sealant is thin enough to move through the tube and fitting. Thick sealants with large particles may flow slowly or clog, so check your sealant type before ordering.
Key Features
150mL Clear Syringe Body
The 150mL body gives you enough room for many common tubeless tire fill amounts without constant refilling. Because the body is clear, you can see the sealant level and stop closer to the amount your tire or sealant brand recommends.
Push-to-Connect Fitting
The push-to-connect fitting is meant to make attachment and removal faster at the valve. That helps reduce drips if you connect it firmly, push the plunger slowly, and keep the valve positioned where sealant will not immediately run back out.
20cm Tube for Easier Filling
The 20cm tube helps you draw sealant from a bottle and guide it into the valve stem. The tube length is useful when the wheel is still on the bike or when the sealant bottle shape makes direct pouring awkward.
Presta and Schrader Valve Support
The included tube is listed as compatible with Presta and Schrader valves. For the cleanest flow, remove the valve core first, attach the tube securely, and inject slowly rather than forcing the plunger.
Polycarbonate and Brass Metal Build
The listing specifies a clear polycarbonate body with brass metal parts. That gives the tool a more substantial feel than a basic disposable syringe, but it still needs cleaning after use because dried latex sealant can block the tube, fitting, or plunger.
How It Performs in Real Use
For Routine Sealant Refreshes
This is the strongest use case for the Beanewone injector. If your tire is already seated and only needs fresh sealant, you can remove the valve core, inject the measured amount, reinstall the core, inflate the tire, and spin the wheel to coat the casing.
For New Tubeless Setups
For a new tubeless setup, the 150mL capacity gives you room to add a larger sealant amount without multiple small syringe fills. It does not replace rim tape, valves, or a strong air source, but it can make the sealant step cleaner once the tire is ready to fill.
For Gravel and Mountain Bike Tires
Higher-volume gravel and mountain bike tires often need more sealant than narrow road tires. The larger body helps here, but chunky formulas may need a slower push and quick cleanup afterward to keep the fitting clear.
For Travel or Tool-Box Storage
The injector is small enough for a home tool drawer, race-day box, or car kit. You still need to store it clean and dry, because leftover sealant can harden inside the tube and make the next use frustrating.
Pro Tip: After injecting sealant, pull a small amount of warm water through the tube and push it back out several times before the sealant dries. This simple rinse helps protect the fitting and plunger for the next refill.
How to Use It Correctly
- Shake your tubeless sealant according to the sealant brand’s instructions.
- Rotate the wheel so the valve is in a practical working position.
- Remove the valve core with the included valve core remover.
- Draw the needed amount of sealant into the 150mL syringe body.
- Attach the tube to the valve and check that the connection feels secure.
- Push the plunger slowly so sealant moves through the tube without excess pressure.
- Reinstall the valve core, inflate the tire, and spin or shake the wheel to coat the inside of the tire.
- Flush the syringe and tube with warm water before storage.
A slow push is better than forcing the plunger. If sealant does not move, stop and check for a clogged tube, a blocked valve stem, or a sealant formula that is too thick for the opening.
[Products Worth Considering]

This PXZBLG bike repair kit helps you tackle common tire and on-the-ride issues with a compact, ride-ready tool collection. It includes a mini tire pump supporting both Presta and Schrader valves, a 16-in-1 bike multitool, tire levers, glueless patches with a plastic box, plus 4mm and 5mm Allen wrenches. A convenient bike bag stores everything so you can mount it on your road bike or mountain bike for lightweight, portable preparedness.

Tiakia’s mini high-pressure frame pump delivers up to 260 PSI for faster, more efficient inflations with an optimized intake volume. It features a double-head valve design compatible with Schrader and Presta, plus a conversion for Donlop, making it versatile for bikes and many inflatables. The lightweight anodized aluminum build includes a mounting bracket for convenient carry, while the flexible high-pressure hose and IPX4 waterproof body support outdoor use.
Compatibility and Safety Notes
The Beanewone injector is made for tubeless bicycle tire sealant and removable valve cores. It is not a general-purpose fluid syringe for food, medical use, brake fluid, cleaners, or other chemicals.
Use it only with sealants and valve setups that match the product instructions. Keep sealant away from your eyes, wash your hands after use, and follow the sealant brand’s label for cleanup, storage, and disposal.
If your valve core is stuck, corroded, or damaged, do not force it with the small tool. Replace the valve core or ask a bike shop for help before you damage the valve stem.
What Buyers Are Saying
Buyer Feedback Snapshot
At review time, the Amazon listing showed 4.4 out of 5 stars from 324 global ratings. The pattern is mostly positive, but not perfect.
- Praise: Many buyers say it makes routine tubeless sealant refreshes cleaner than pouring sealant directly into the tire.
- Praise: Users often like the clear body because it helps with measuring and checking the sealant level.
- Watch-out: Durability feedback is mixed, and thicker sealants may clog or move slowly through the injector.
Pros and Cons
Pros
- 150mL clear body helps you measure sealant and reduce refill stops.
- Works with Presta and Schrader valves when the valve core is removed.
- Includes the valve core remover needed for most clean valve-fill jobs.
- 20cm tube makes bottle-to-valve filling easier than direct pouring.
- Polycarbonate body and brass metal parts feel more purpose-built than a disposable syringe.
Cons
- Thick or chunky sealants may not flow cleanly through the tube and fitting.
- It needs prompt cleaning after use or dried sealant can block the parts.
- Not the best choice for heavy shop use if you want a premium professional tool.
Is It Worth the Price?
The Beanewone 150mL Tubeless Sealant Injector sits in the budget-friendly tool category. It is a strong value for the price if you service tubeless tires more than once or twice a year and want better control than pouring sealant by hand.
You get the most value from it if you already use tubeless bike tires and need a cleaner refresh process at home. The included valve core remover adds convenience because you do not need to buy that small tool separately.
It is not the best fit if you use very thick sealants, if your valves do not have removable cores, or if you want a shop-grade injector for daily commercial work. In those cases, compare higher-end bike tool options before buying.
How It Compares to Alternatives
Compared with the Park Tool TSI-1, the Beanewone injector is more budget-focused and includes a clear 150mL body for measured home use. Park Tool may appeal more if you prefer a long-established bike tool brand.
The KOM Cycling Tubeless Sealant Injector and Stan’s Tubeless Tire Sealant Injector are also worth comparing if you want a different syringe design or already use Stan’s sealant. The Beanewone makes the most sense if you want a simple kit with a large clear body, Presta and Schrader support, and a valve core remover included.
Frequently Asked Questions
Does the Beanewone Tubeless Sealant Injector work with Presta and Schrader valves?
Yes. The included tube is listed as compatible with Presta and Schrader valves. For the cleanest flow, remove the valve core before injecting sealant.
Is the valve core remover included?
Yes. The kit includes a valve core remover tool along with the 150mL injector and 20cm tube. That is useful because valve-core removal is the normal way to fill through the valve cleanly.
Can it handle all tubeless sealants?
No injector works equally well with every sealant. Standard liquid sealants should move more easily, while thicker formulas or sealants with larger particles may flow slowly or clog.
How much sealant can it hold?
The syringe body is listed at 150mL. That capacity is helpful for larger bike tires or setup jobs where a smaller syringe would need several refills.
How do you clean it after use?
Flush the syringe and tube with warm water soon after use. Let all parts dry before storage so sealant does not harden inside the tube, fitting, or syringe body.
Is it a full tubeless tire setup kit?
No. It is a sealant injector kit, not a complete conversion kit. You still need tubeless-ready tires and rims, valves, sealant, rim tape if required, and a suitable air source.
Who should skip this injector?
Skip it if you rarely refresh tubeless sealant or already have a direct-fill bottle nozzle that works cleanly. You may also want a higher-end tool if you work on bikes daily in a shop setting.
What is the biggest mistake to avoid?
Do not force the plunger if the sealant is not moving. Stop, check the tube and valve for blockage, and confirm that your sealant is not too thick for the injector.
The Bottom Line
The Beanewone Tubeless Sealant Injector is a practical choice if you service tubeless bike tires at home and want a cleaner way to measure and inject sealant. Its main strengths are the 150mL clear body, 20cm tube, valve core remover, and Presta/Schrader compatibility.
Skip it if you use very thick sealants, need a professional shop-grade injector, or rarely handle tubeless maintenance. For most home riders using standard tubeless sealant, it is a sensible budget-friendly tool with a clear limitation: flow depends on sealant thickness and careful cleaning.
Related Articles
Tire Screw Plug Repair Kit Review
Compact tire screw plug repair kit review reveals fast roadside fixes, but which punctures are truly safe enough to trust?
Read More
Wall Mount Spare Tire Carrier Mount Review
I review the wall mount spare tire carrier’s fit, strength, and stability—see what could make or break your trailer setup.
Read More
Socpuro Tire Repair Patch Tool Kit Review
Great for quick DIY puncture fixes, the Socpuro Tire Repair Patch Tool Kit has limits and surprises you’ll want to know before buying.
Read More